


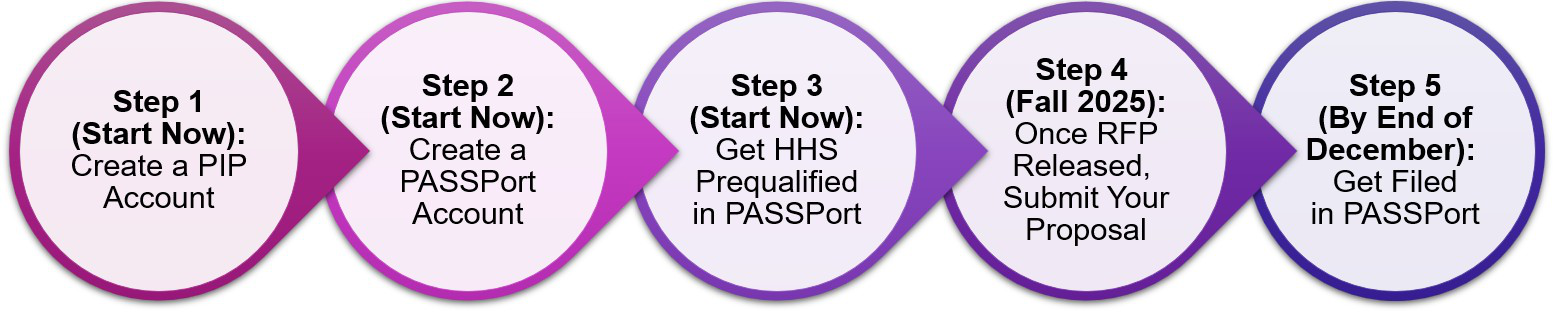
COMPASS RFP: Five Steps to Get Ready and Submit Your Proposal in PASSPort
DYCD plans to release the COMPASS RFP in PASSPort in the Fall of 2025.
Important: Only nonprofit organizations with an Approved HHS Prequalification in PASSPort will be eligible to submit a proposal in PASSPort once the RFP has been released.
This guide walks you through the five steps to get started and submit your proposal, plus a checklist to help you stay on track.
Before We Begin
It helps to know who does what:
-
DYCD (Department of Youth and Community Development) runs the COMPASS program and will release the RFP in PASSPort (expected in the Fall of 2025).
- For COMPASS program-related questions, contact DYCD.
- After the COMPASS RFP is released in PASSPort, use the RFP's Discussion Forum to connect with DYCD.
-
MOCS (Mayor's Office of Contract Services) oversees NYC procurement and manages PASSPort, the City's digital procurement platform which supports the full contracting process between vendors and City agencies.
- For PASSPort-related questions, reach out to the MOCS Service Desk.
Step 1: Create a PIP Account (Start Now)
Create a PIP (Payee Information Portal) account to become a City vendor and get registered in the city's financial management system. It's best to do this before setting up your PASSPort account, but you can do it afterward if needed.
- ☐
Create a PIP account.
- For guidance, refer to the new vendor resources listed on the PIP website, including this tutorial: PIP Activation eLearning #1 - New Vendor.
- Need help? Email the PIP Help Desk at pip@fisa-opa.nyc.gov.
- ☐
Unsure if you have a PIP account?
- Click the Activate button, follow the prompts, and use the Company Search to look up your organization. If it displays: Yes under Activated?, you're all set.
Step 2: Create a PASSPort Account
(Start Now)
Create a PASSPort account for your organization, then add your staff and add user roles.
- ☐
Create a PASSPort account.
- Register an NYC.ID, then submit a PASSPort account request.
- For instructions, refer to this guide: Create a PASSPort Account.
- Once approved by MOCS, you can log in to PASSPort.
- ☐
Add staff and assign user roles.
- Add the necessary staff as contacts to the Vendor Profile and assign the correct user role(s) for their responsibilities. Each contact can hold multiple roles.
- For instructions, refer to this guide: Add Users and Assign Roles
- To be able to work in PASSPort, staff must:
- Be added as a contact
- Be assigned at least one user role
- Register a NYC.ID
- Learn who can do what:
Task in PASSPort Who Can Complete the Task Add contacts and assign user roles Vendor Admin Work on proposal Vendor Admin
Vendor Procurement L1
Vendor Procurement L2Submit proposal Vendor Admin
Vendor Procurement L2Work on HHS Prequalification Vendor Admin
Vendor Procurement L1
Vendor Procurement L2Submit HHS Prequalification Vendor Admin
Vendor Procurement L2 - Required Roles: Three user roles must be assigned at least one contact to complete all tasks in PASSPort:
- Vendor Admin
- Signatory
- Vendor Contract Signatory
-
Optional roles: All other user roles are optional (Contributor, Vendor Procurement L1 & L2) and can be assigned to provide task-specific access.
Example: If your organization is small with only one person handling PASSPort tasks, assign all three required roles to yourself. Larger organizations may prefer to assign roles based on task-specific responsibilities.
- ☐
Already have a PASSPort account? Great!
- Review your Vendor Profile to make sure all relevant staff are listed, the necessary user roles are assigned, and contact information, especially email addresses, is accurate to receive important PASSPort email notifications.
Step 3: Get HHS Prequalified in PASSPort (Start Now)
Important: Without an Approved HHS prequalification, you won't be able to submit a proposal!
Only providers with an Approved status HHS Prequalification in PASSPort will be notified by email once the COMPASS RFP has been released in PASSPort and will be eligible to submit a proposal for the RFP (or any other human service RFP in PASSPort).
- ☐
Get HHS prequalified in PASSPort – submit the application.
- For instructions, refer to this guide: Submit the HHS Prequalification (PQL) Application.
- ☐
Was your submitted HHS PQL Application returned?
- Review the notes from your MOCS Reviewer's email, make revisions and resubmit.
- ☐
Already HHS prequalified? Great!
- Confirm that your prequalification status displays: Approved and that the expiration date is not approaching soon.
- To confirm, look for the Current Status and Qualification Expiration Date fields in PASSPort. For instructions on where to find these, consult the Find the HHS Prequalification List section of the Renew the HHS Prequalification guide.
- HHS Prequalification Approved but expiring in the next few months? Renew now, or at a minimum 30 days prior to expiration, to ensure you're prequalified when the RFP is released.
- ☐
HHS Prequalification expired? Renew now to make sure you're prequalified when the RFP is released.
Step 4: RFP Release, Submit Your Proposal (In Fall 2025)
Once the COMPASS RFP is released this Fall 2025, it will be open for response submissions in PASSPort. This step explains how to prepare for the RFP release and submit a proposal.
Before the RFP Release
- ☐
Get familiar with common PASSPort terms. For the complete list, refer to this guide.
| PASSPort Terms | What It Means |
|---|---|
| RFx | The term for solicitations in PASSPort (e.g., RFP or RFI). |
| Response | A vendor's response to an RFx (e.g., a proposal or bid) |
| HHS Prequalification | Required to respond to any Health and Human Service RFx, incl. the COMPASS RFP |
| RFx Status: Planned | RFx is not yet open for responses. |
| RFx Status: Released | RFx is open and accepts responses. Time to submit your proposal! |
| Due Date | Proposal submission deadline – submit early! |
| RFx Status: Responses Received | The due date has passed. The RFx no longer accepts responses. |
When the RFP is Released
- ☐
Find the RFP.
- Log in to PASSPort and go to RFx > Browse Public RFx. Enter “COMPASS” in the Keywords field, then click Search.
- Tip: Once you've found the RFP, click the star icon in the upper left corner to save it as a favorite. Next time you log in, just click the star again to quickly access your saved search.
- To learn more about finding RFx in general, refer to this guide: Search for Opportunities.
- ☐
Check the RFx Status.
- If it displays: Released, the RFP is open and accepts your proposal.
- ☐
Submit your proposal as early as possible!
- Review the RFP details and documents to ensure you organization is eligible to respond and interested in delivering the services mentioned in the COMPASS RFP program.
- For instructions, refer to this guide: Respond to RFx, as well as additional RFx Response resources listed on this page.
- Give yourself enough time to prepare the proposal and carefully review it once done; once submitted, your proposal cannot be changed or retracted.
- Submit your proposal at least one week prior to the due date.
- ☐
Need Help?
- For program-related questions, use the Discussion Forum to connect with DYCD.
- For PASSPort-related questions, contact the MOCS Service Desk.
After You Have Submitted
- ☐
Confirm successful submission.
- After submitting, check the Submission Status of your response. If it displays Submitted, congratulations – you have successfully submitted your proposal!
- ☐
Keep an eye on PASSPort notifications.
- If new information becomes available, DYCD may publish and addendum to the RFP. PASSPort sends a notification when an Addendum is released. The addendum will explain the new information and outline any next steps you may need to take.
When DYCD closes the COMPASS RFx in PASSPort, the RFx Status will change from Released to Responses Received. This means proposals are no longer accepted.
Step 5: Get Filed in PASSPort (By End of December)
After you submitted your proposal and before the end of December 2025, we encourage you to get Filed in PASSPort.
Getting Filed means completing the PASSPort Vendor Enrollment by answering business questions and uploading required disclosures.
Once Filed, the City can review your disclosures and begin any contracting actions.
- ☐
Get Filed in PASSPort.
- For step-by-step instructions, refer to this guide: Complete the PASSPort Vendor Enrollment.
- ☐
Already Filed in PASSPort? Great!
- Review your PASSPort Vendor Profile and update your disclosures if needed.
- Need to make changes? Refer to this guide: Submit a Change Request.
- Need to update CEO section? Refer to this guide.
- ☐
Unsure if You're Filed?
- Log in to PASSPort, and on the homepage, check the Vendor Check List for the Vendor Record Status:
- Filed = You're all set
- Draft = Incomplete Vendor Enrollment, complete the PASSPort Vendor Enrollment
- Log in to PASSPort, and on the homepage, check the Vendor Check List for the Vendor Record Status:
What Happens Next
- DYCD will review all proposal submissions and make contract award decisions in Spring 2026.
- If your proposal is Selected, you will receive a PASSPort email notification with next steps.
- Want to check your selection status?
- Selected: Congratulations! Your organization has been selected for a contract award. DYCD will reach out with next steps. Learn what happens next – refer to this guide: COMPASS RFX: Next Steps After Contract Award Selection.
- Not Selected: Your organization was not selected for an award. No PASSPort email notification email is sent.
Note: Selection decisions are not expected until the Spring of 2026.
Checklist
Click here to download a printer-friendly checklist. It helps you stay organized and track your progress as you complete the steps to submitting your COMPASS RFP proposal in PASSPort.
For step-by-step instructions, refer to the corresponding section in this guide.
- Create a PIP Account (Start Now):
- ☐
Register a PIP account for your organization.
- ☐
- Create a PASSPort Account (Start Now):
- ☐
Create an NYC.ID and submit your PASSPort Account Request. Once MOCS approves it, you can log in to PASSPort.
- ☐
Add contacts to your PASSPort Vendor Profile and assign the relevant user roles.
- ☐
If you already have a PASSPort account
- ☐ Confirm the right contacts are listed.
- ☐ Check all contacts' email addresses are correct.
- ☐ Confirm contacts have been assigned the necessary user role(s).
- ☐ Confirm all contacts can log in to PASSPort.
- ☐
- Get HHS Prequalified in PASSPort (Start Now):
Only Approved status providers can submit a proposal to the COMPASS RFP!- ☐
If your Application was returned, revise and resubmit asap.
- ☐
If your Application was returned, revise and resubmit asap.
- ☐
If you're already HHS Prequalified, check the Current Status and Expiration Date.
- ☐ If your HHS Prequalification has expired or is expiring soon, renew asap.
- ☐
Confirm HHS Prequalification Current Status displays: Approved, and your Prequalification does not expire anytime soon.
- ☐
- Submit Proposal in PASSPort (Once the RFP is Released Fall 2025):
- ☐
Review the COMPASS RFP details to confirm eligibility and interest.
- ☐ Carefully review your proposal prior to submission; you cannot change or retract it.
- ☐
Submit proposal at least one week before due date.
- ☐
Confirm Proposal Submission Status displays: Submitted.
- ☐
- Get Filed in PASSport (By the End of December 2025):
- ☐
Submit Vendor Enrollment Package (also known as: get Filed).
- ☐
If you're Filed already:
- ☐ Review your Vendor Profile and Disclosures to make sure everything is accurate.
- ☐ If changes are needed, submit a Change Request.
- ☐
Confirm Vendor Record Status displays: Filed.
- ☐
Last updated: July 31, 2025