
 NYC Housing Authority311Search all NYC.gov websites


Virtual Logbook System for Vendors
NYCHA has implemented a virtual logbook system to improve efficiency and promote transparency. This system is part of NYCHA’s effort to use technology to modernize operations and streamline onsite processes for both NYCHA and vendors.
All vendors and subcontractors performing work at a NYCHA development must complete a Pre-Check form, a Check-In Form, and a Check-Out form. Vendors can access the Check-In and Check-Out forms onsite by scanning a QR code with any internet-connected mobile device. This online form replaces the paper logbooks previously used at developments.
Pre-Check Form
The designated supervisor for all vendors and subcontractors must complete a Pre-Check form online at least 24 hours before any site visit, including scheduled visits.
- Use this Pre-Check form.
After submitting a Pre-Check form, the vendor will receive an email with a Pre-Check ID. This unique ID will be used by staff on site when they Check-In and Check-Out.
Check-In and Check-Out Forms
- The online form, accessible via a QR code at the site, replaces the paper logbooks previously used.
- This form must be completed upon arrival and departure from the site by the contractor and each subcontractor.
- Vendors should use their Pre-Check ID to Check-In
- This requirement confirms the accuracy and truthfulness of the information provided. Non-compliance or submission of false information is considered a violation of the contract.
For guidance on how to complete these processes, please review the step-by-step instructions in the following documents:
- Vendor Manual
- Vendor Website Training Session Recording (Coming soon)
If you have any questions, please email VirtualLogBook@nycha.nyc.gov.
Frequently Asked Questions
Location Services Troubleshooting
Questions on sharing your location when submitting forms
How do I enable location services on an Android device?
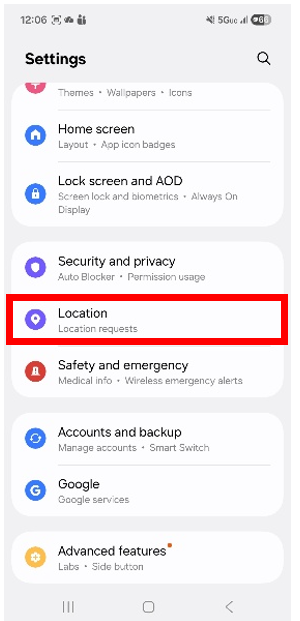
- First, open the Settings app on your phone.
- In the setting menu, scroll down and select “Location.”
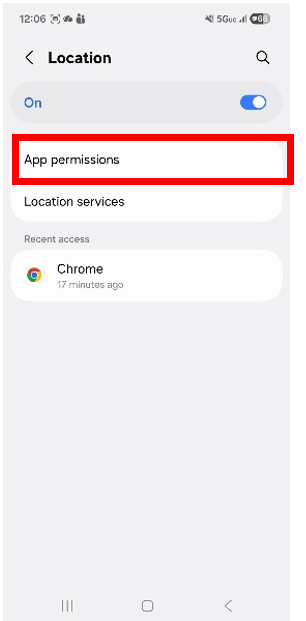
- Then select “App Permissions”
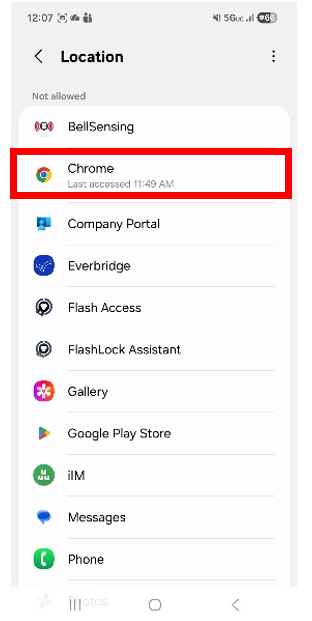
- Scroll down until the Not allowed section and click on any browser present
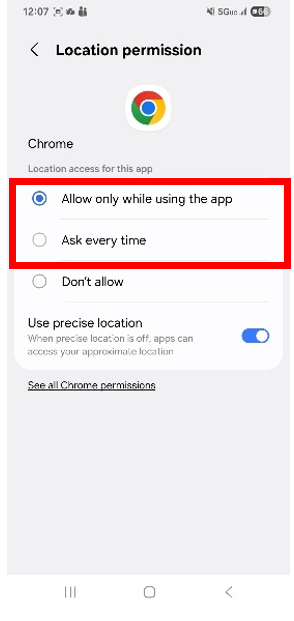
- Change the setting to “Allow only while using the app” or “Ask every time” for each browser
How do I enable location services on an Apple device?
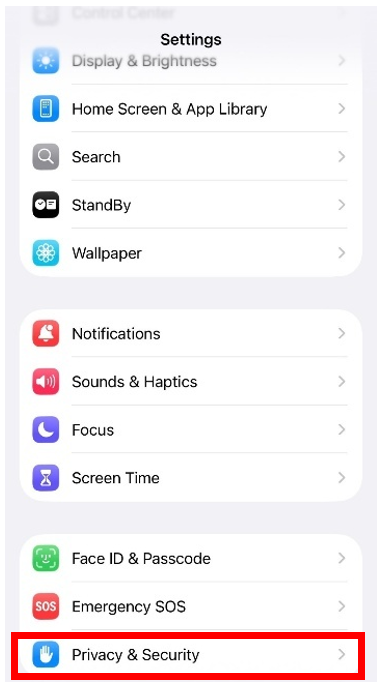
- First, open the Settings app on your phone.
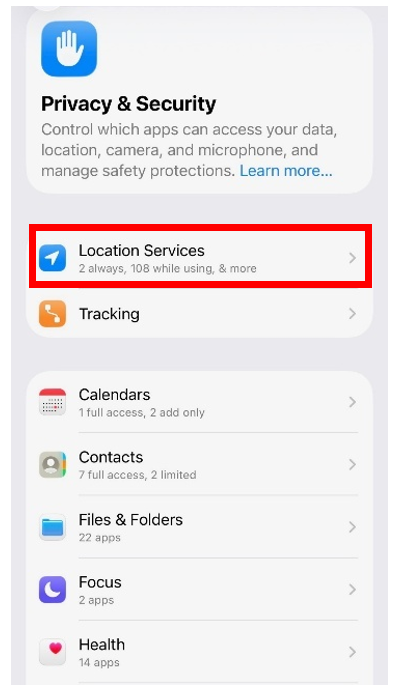
- In the setting menu, scroll down and select “Privacy & Security.”
- Then select “Location Services.”
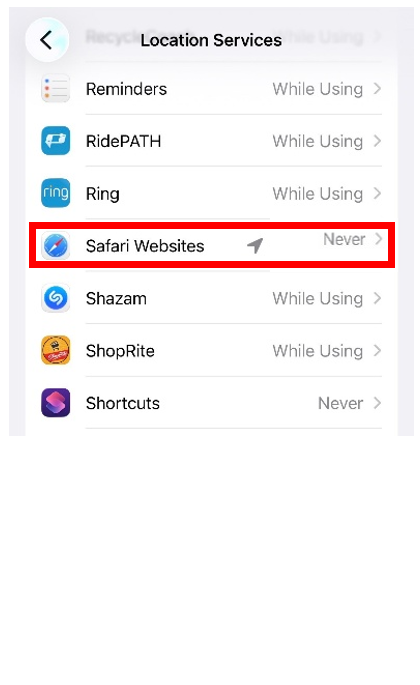
- Scroll and select any browser set to “Never”
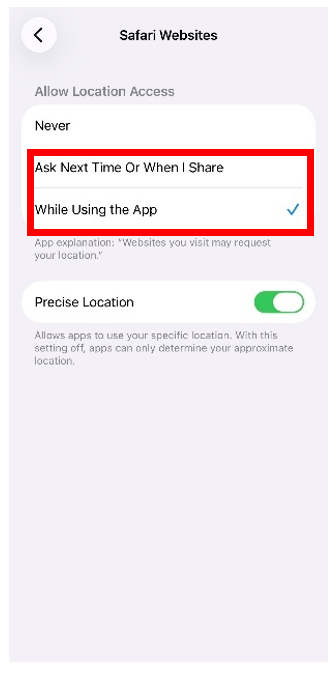
- Change the setting to “While using the App” or “Ask Next Time Or When I Share” for each browser
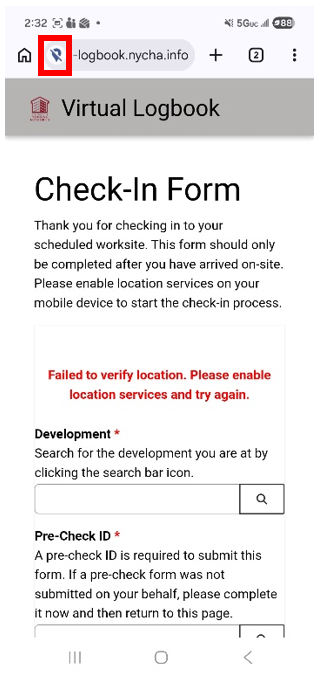
I denied location services on Chrome; how do I fix it?
-
First click the icon to the left of the web address virtual-logbook.nycha.info
-
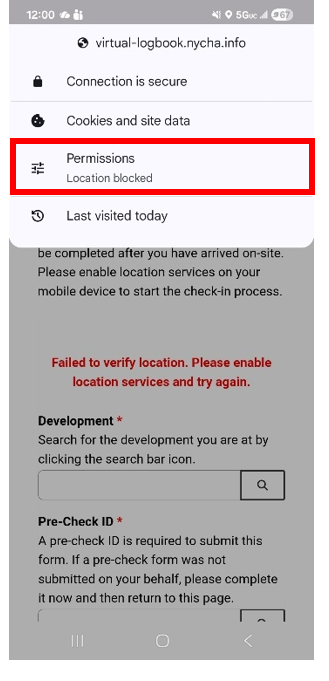
When the menu appears select “Permissions”
-
Make sure you device is set to allow “Location” with the blue circle to the right .
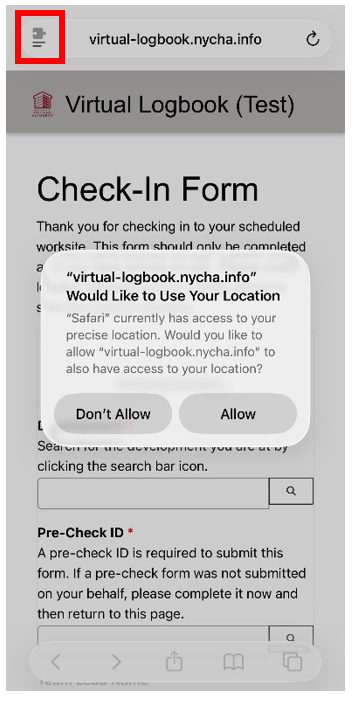
I denied location services on Safari; how do I fix it?
- virtual-logbook.nycha.info must be allowed, or you will need to change the permissions.
- Go to the top left and select the menu icon.
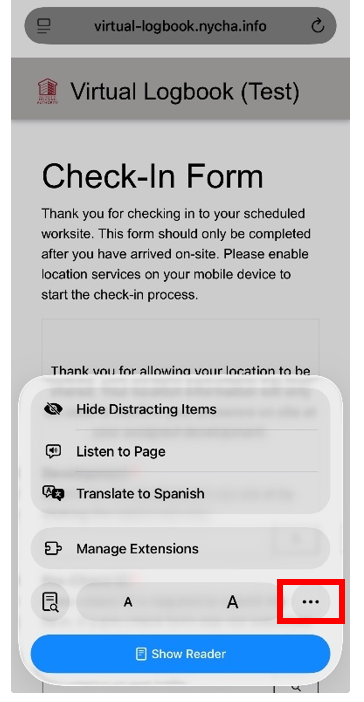
- When the menu appears, select the 3 dots on the bottom right
- Then the Page Menu will pop up. Scroll down and click on “Location” then select “Allow”

General
Common questions about the process overall
Do I need to log in to fill out the information?
- No, login is not required for the website.
I am typing my company name, but nothing is happening; What should I do?
- First, click the Search Bar Icon [Magnifying glass]
- Then type the vendor name in the search field.
- If you are a subcontractor, use the primary vendor name who has a contract with NYCHA.

What if I do not have any service while checking in or out?
- You can submit the form from any location at the development. If there is no cell signal or service inside where you scan the QR code, you may walk outside and submit. You will still be registered as on site as long as you are within a half-mile radius around the development. While completing the check-in and check-out forms in the management office is encouraged, we understand that it may not always be possible.
What should I do if the website or the QR code is not working on site?
- If it is not working, you should sign the physical vendor book and email Virtual.Logbook@nycha.nyc.gov that you were unable to complete your Check-In/Out
Pre-Check Form
Scheduling the work and filling out the form correctly
When do I need to submit the Pre-Check form?
- The vendor supervisor should submit the Pre-Check form at least 24 hours before work is scheduled to begin. If the supervisor did not fill out the form, the lead staff on site will need to fill it out.
What is a Pre-Check ID and how do I get one?
- A Pre-Check ID is a unique identification number generated after the Pre-Check form is submitted. It will be sent to the supervisor's email address provided in the form. This number should be shared with staff who will be checking in onsite. The Pre-Check ID will link the Pre-Check form with the Check-In and Check-Out forms for the same job.
What if I do not have my PO?
- If the PO # is missing, vendors can select “I do not have an active PO/Release” from the top of the PO field in the Pre-Check form. Vendors should have a PO before starting work onsite, but they will still be able to sign in.

How many workdays are covered by my Pre-Check?
- Vendors can fill out a single Pre-Check form for one day of work, or even for several consecutive days or weeks.
Check-In Form
Signing in and correctly completing the form
Why does the form ask for my location?
- Location services are used to verify that you are at the correct development. Your coordinates are only recorded at the exact moment of form submission and are not tracked afterward.
What if I don't have a Pre-Check ID when I arrive?
- A Pre-Check ID is required to submit the Check-In form. If a Pre-Check was not previously submitted, the lead staff on site must complete the Pre-Check form before completing the Check-In. Your supervisor will then receive your ID in an email.
- If the Pre‑Check was already submitted but you don’t have the ID, you can search by your supervisor’s name or your company name. If you have multiple POs that day, be sure to select the correct one.
How many POs can I check in for?
- For each PO that a vendor has, they must submit (1) Pre-Check and (1) Check-In form. If a vendor has multiple POs, they must submit separate Pre-Checks and Check-Ins.
If my Pre-Check covers multiple days, do I still need to Check In and Check Out every day?
- Yes. Even if your Pre-Check ID covers a weeklong span, the Team Lead must perform a Check-In when arriving, and a Check-Out when leaving each day.
Check-Out Form
Signing out and correctly completing the form
How do I Check Out?
- After completing your work on site, you should scan the QR code. On the Check-Out form, search and select the name of the Team Lead that filled out the Check-In form.

Do I need to check out if I am visiting multiple developments in one day?
- Yes, you must check out before leaving a development, even if you are heading to another NYCHA location for more work that same day. You will then complete a Check-In at the next development when you arrive.
Cancellations & Changes
Changing or cancelling a submitted form
How do I cancel a scheduled day of work?
- To cancel, locate the confirmation email you received after your initial Pre-Check. Click the cancellation link provided in that email to navigate to the Cancel Form. Or visit virtual-logbook.nycha.info/Cancel-Pre-Check
- You must type in the Pre-Check ID sent in the initial email to cancel.
If I cancel a Pre-Check, how do I reschedule?
- You must first cancel the existing Pre-Check and then fill out a brand-new Pre-Check form for the new dates.
I made a mistake; can I make changes?
- No. Once the form is submitted, the information cannot be changed. The only form that can be cancelled is the Pre-Check. Please ensure all information is accurate before submitting.