
 Buildings311Search all NYC.gov websites


Filing Permit Applications
New York City laws require that one or more permits be obtained before starting construction work (refer to NYC Building Code §27-126 for work that requires a permit). Some application can be submitted at a borough office. However, there are some job filings that must be submitted online in DOB NOW: Build.
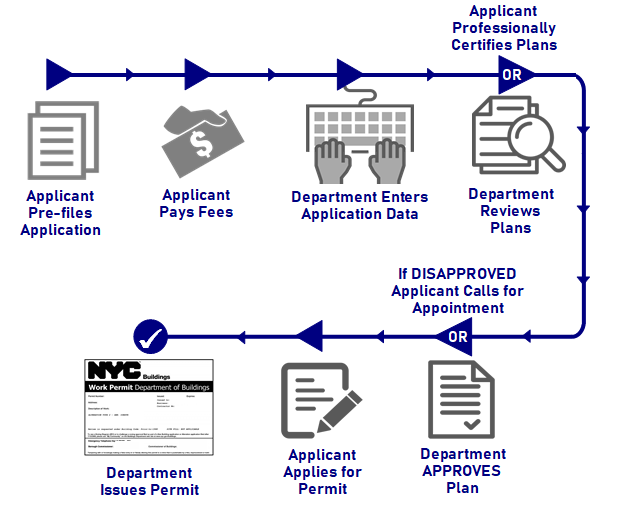
The diagram and steps below describe DOB's general process for filing an application at a borough office and obtaining a permit for jobs that are not professionally certified.
Click a topic, or press the enter key on a topic, to reveal its answer.
Step 1: Applicant pre-files application in a borough office
Applicant meets with a Department pre-filer at a borough office and submits three (3) copies of each of the following:
- Complete set of drawings, including energy calculations.
- PW1 Form (attach Schedule A, Schedule B, and Schedule C if necessary).
- Asbestos Forms
The pre-filer checks the documents to make sure the application is complete, estimates cost and determines job type, then enters the basic job information into Buildings Information System (BIS), assesses the fee and assigns a BIS Job Number to the application.
*Note: When the pre-filing phase is completed, the application folder is given back to the applicant. Applicant will bring the application folder to the cashier when ready to pay the fee.*
Step 2: Applicant Goes to Cashier and pays the fee
Applicant submits the application folder to the cashier and pays the fee. The cashier then transfers the folder to the Data Entry and Research (DEAR) Unit.
Step 3: Department data enters application details
- DEAR reviews the application information.
- DEAR data enters the application details.
- DEAR transfers the application folder to the Plan Examination Unit.
*Tip: Applicant can use the BIS Job# assigned during the pre-filing to check BIS-on-the-WEB for current application status 'Building Information Search' any time during the entire process.*
Step 4: Department reviews application plan
A Plan Examiner reviews the plan for compliance with one of the requirements below:
- Directive 14 requirements: zoning (use), egress and LL58/87 (disability) only.
- Directive 2 requirements:
- Egress (Building Code)
- Fire Protection (Building Code)
- Multiple Dwelling Law
- Housing Maintenance Code
During the review, the Plan Examiner enters any required items needed for the construction work being described into BIS. (refer to Required Items)
*Note: Sprinkler applications are filed under Directive 14 but receive a Directive 2 review to ensure the water supply is in compliance with the Building Code.*
If the plan is approved
- Plan Examiner stamps and signs the three complete sets of approved plans and other appropriate paperwork.
- Plan Examiner data enters approval status into BIS.
- Applicant is given the approved application (drawings and forms) to be perforated at the Record Room or other area designated by the borough.
If the plan is disapproved
- An objection sheet will be completed by the Plan Examiner and emailed to the applicant (or mailed when email address is not available), informing applicant of areas that do not conform to applicable laws.
- Plan Examiner enters disapproval data status into BIS.
- Applicant calls 311 to make an appointment to resolve the objections.
The process described above may be repeated until all objections are resolved and the plan is approved.
*Note: If changes need to be made to the plan after the plan is approved, the applicant may be required to file a Post Approval Amendment (PAA). A PAA is any change to the approved scope of work that is significant and will require submission of revised plans.*
Step 5: Department perforates the plan
- Applicant brings the folder to Record Room
- Record Room clerk perforates the plans and forms and returns them to the applicant
- Applicant is required to microfilm the approved application (plans and forms) and deliver them to the Record Room before obtaining a permit
- Record Room clerk files the microfilm and stamps the folder and returns it to the applicant. The application is now ready for permit.
Step 6: Applicant obtains permit
- Applicant submits to the permit clerk the approved folder with a stamp indicating that microfilm has been received, along with the documents below:
- PW2 Form – signed and notarized by contractor. If licensee, seal is required in lieu of notarization
- PW3 Form (cost affidavit) – signed by contractor and notarized; if a licensee, sign and seal
- A check for $35.00 (final microfilming fee)
- Permit clerk checks for fees due and valid insurance prior to producing the permit
- Any fees due, including balances and civil penalties for Work Without a Permit, must be paid prior to permit issuance
- Appropriate insurance must be held by all potential permittees unless the permittee is a homeowner who will be performing the work in their own home. In that case, a waiver from Worker's Compensation Board must be submitted.
- The permit is generated and the permit clerk enters the permit issuance date into BIS.
- The application folder is retained by the permit clerk and sent to the Record Room for filing.
Step 7: Post Permit Activities
Some applications require a new or amended Certificate of Occupancy, and others should simply be signed off when the work has been completed.
Helpful Links
- Permit Applications Through DOB NOW
- Renewing Permits
- Plan Exam Appointments
- Obtain a Certificate of Occupancy
- Professional Certification
- Forms & Applications
- Subscribe to Buildings News
- PW1 Form & PW1 User Guide
- PW2 Form & PW2 Instructions
- PW3 Form & PW3 Instructions
- PW1A Schedule A Form & PW1A Instructions
- PW1B Schedule B & PW1B Instructions
- PW1C Schedule C Form & PW1C Instructions