


Submit a Budget Modification
Need to reallocate funding and modify your current budget? Submit a budget modification by creating a Purchase Order Change Request (POCR) on your Active Purchase Order (PO).
Before we begin
To create and modify budgets, one or more of the following PASSPort user roles are required:
- Vendor Admin
- Vendor Financials L1
- Vendor Financials L2
To confirm task authorizations, a Vendor Admin must:
- Go to nyc.gov/passport and click the PASSPort Login button.
- Click the Contacts tab on the left side of the Vendor Profile.
- Locate the user in the Vendor Contact Information section. Make sure the user is listed as a contact with the correct email address, and in the Profile column they have one of the required roles listed above.
- Then, on the top navigation menu of PASSPort, click Contracts, and click Manage My Contracts. Find the contract with the budget to be created or modified and click the pencil icon to the left of the contract listing.
- Click the Setup Team tab located on the left-side in the Contract. In the Vendor Team section, make sure the user is listed as a contact. If they are listed, the user can proceed to create or modify the budget. If they are not listed, see the Add or Delete Contacts section of this guide for instructions: Edit the Vendor Team.
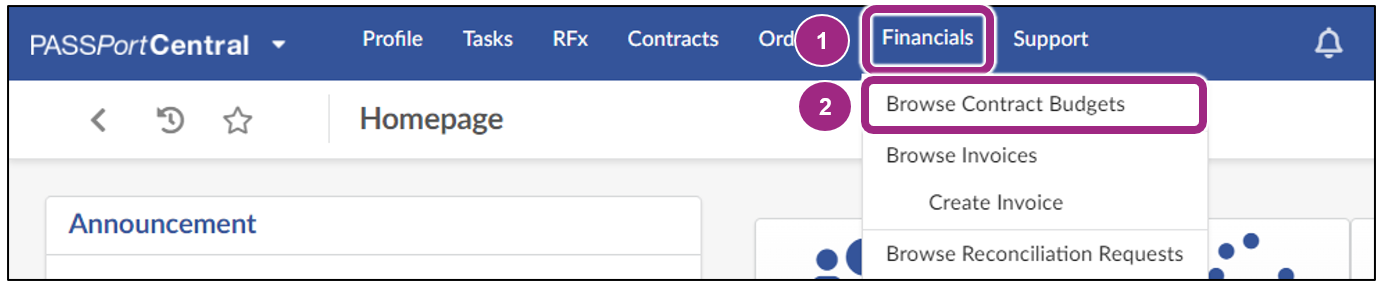
1. Find the Purchase Order
- Click Financials in the top navigation menu.
-
Select Browse Contract Budgets from the drop-down menu.
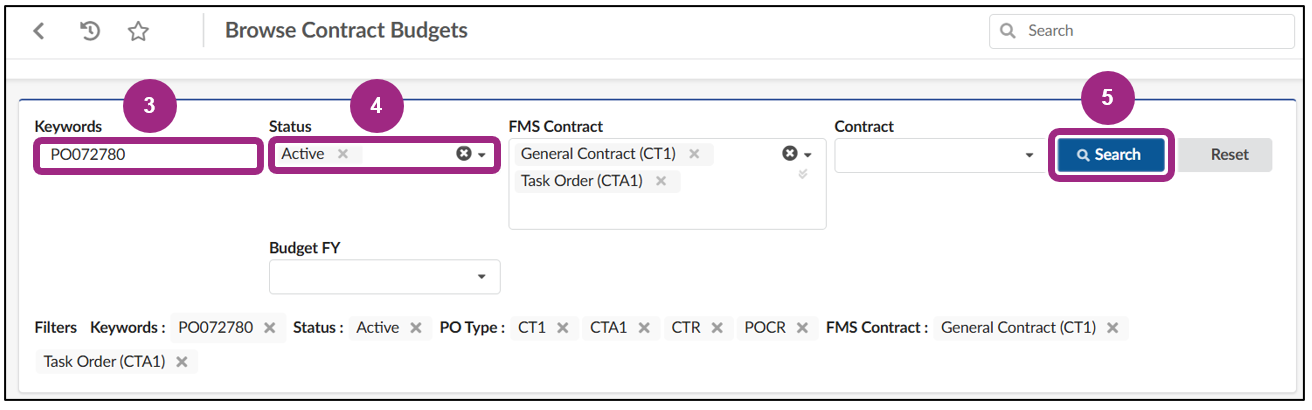
- In the Keywords text field, enter the Purchase Order ID (PO ID). If you do not know the PO ID, you may enter other search options such as the Contract ID.
- In the Status field, remove the In Progress and Registered filters, so that only Active displays.
-
Click the Search button. Results matching your criteria will appear in a table below the search fields.
-
In the search results, click the pencil icon or the PO ID link to open the Purchase Order (PO).

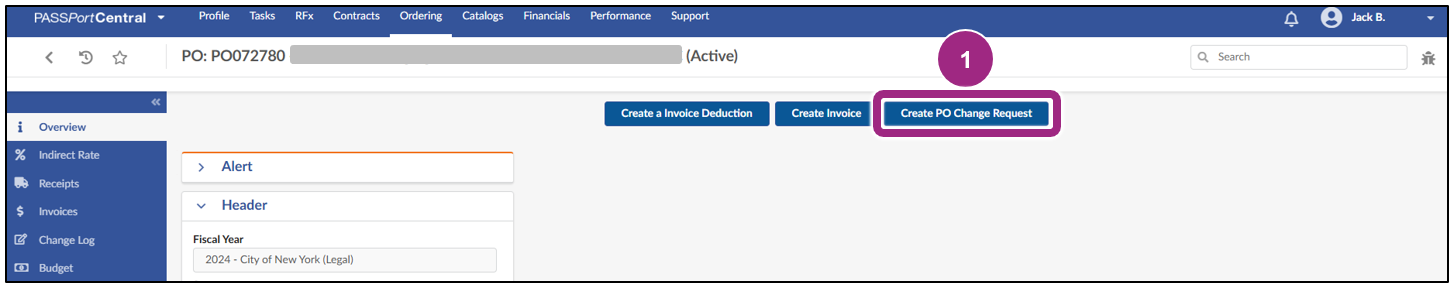
2. Create the Purchase Order Change Request (POCR)
-
Click the Create PO Change Request button at the top of the page.
Note: If the Create PO Change Request button does not display, it may be due to:
- You might not have a required user role. See Before We Begin of this guide for details.
- The contracting agency might not have (or not yet) enabled vendor-submitted budgets.
- A Purchase Order Change Request (POCR) may already in progress. Previously initiated POCRs can be found by clicking on Change Log on the left-side navigation. Submit any pending POCRs or send your contract agency a request to cancel.
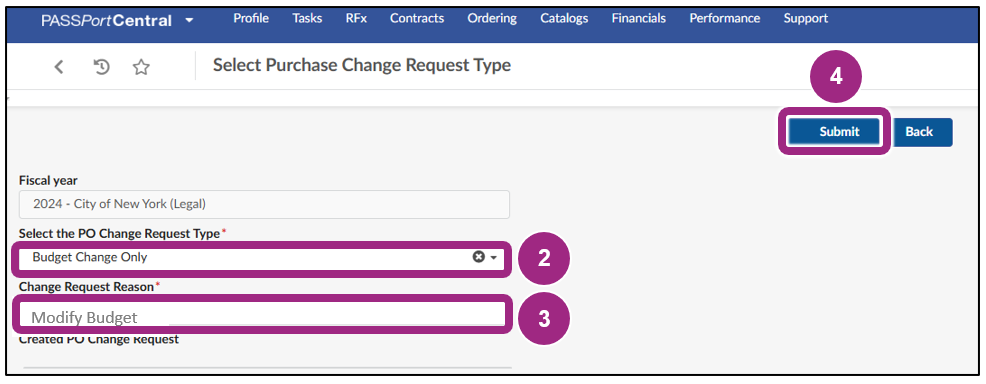
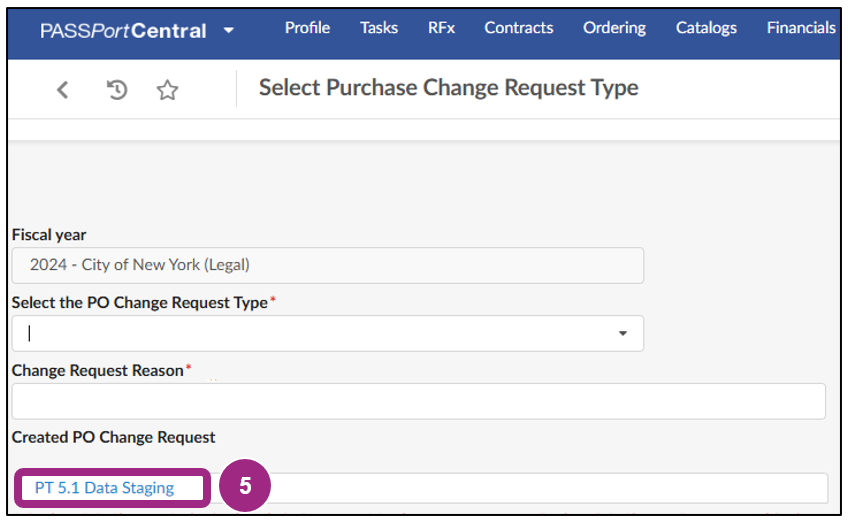
The Select Purchase Change Request Type page appears.
- Click the Select the PO Change Request Type drop-down and select the option: Budget Change Only.
- In the Change Request Reason text field, enter a reason for the change request. In this example, we're looking to modify a budget and enter “Modify Budget.”
-
Click the Submit button at the top of the page.
-
When the POCR is created, in the Created PO Change Request field, hyperlinked text will display. Click the hyperlink.
The Purchase Order (PO) appears.
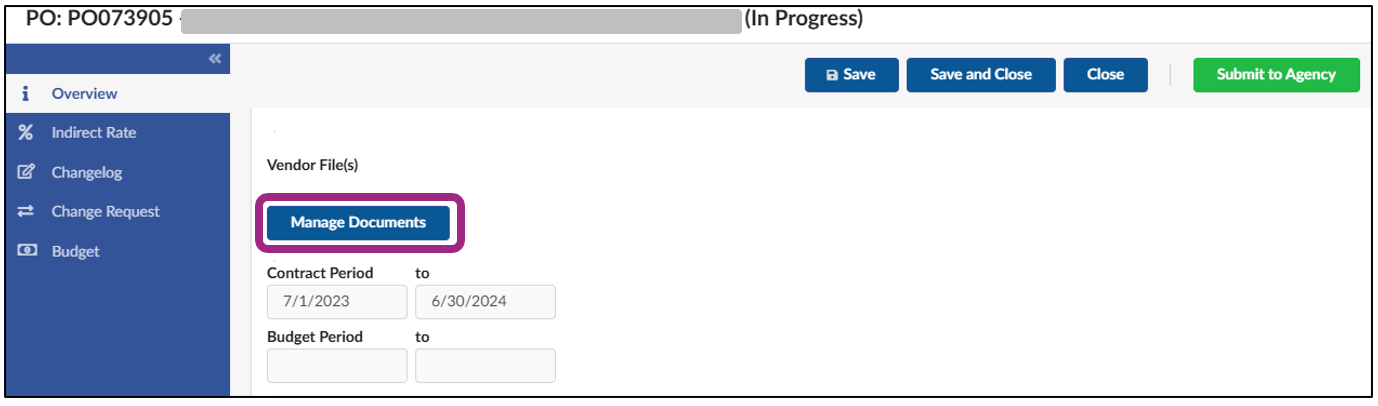
3. Upload Required Documentation
Refer to your contracting agency's fiscal guidance if backup documentation is required.
If supporting documentation is required: In the Overview tab of the Purchase Order, click the Manage Documents button to upload required documents. Follow the prompts. The file size limit is 300MB.
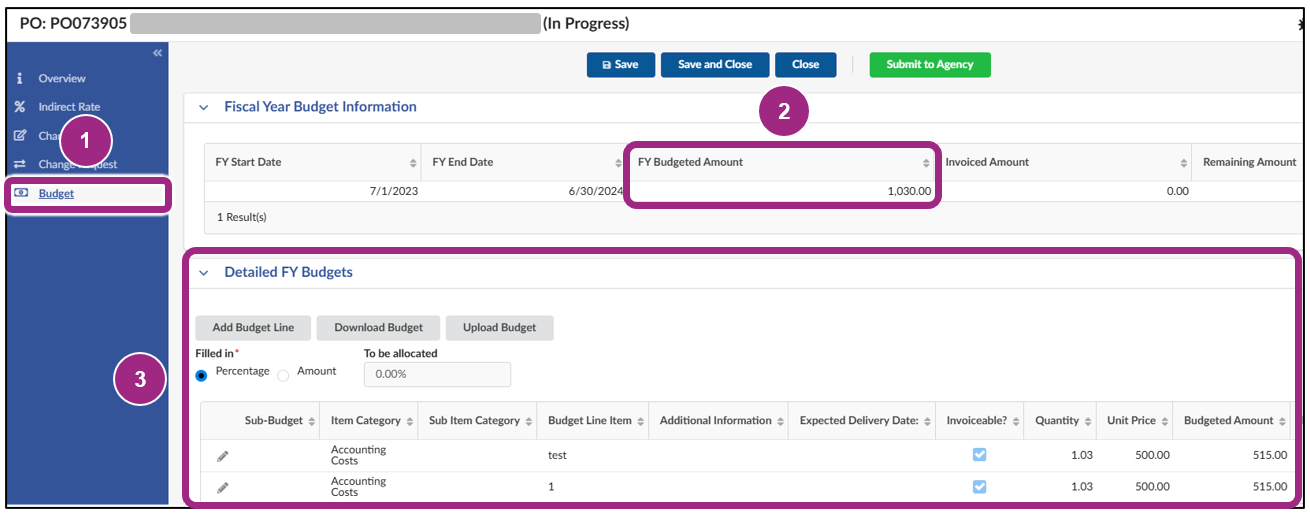
4. Review the Budget Information
- Click the Budget tab of the PO. The budget displays.
- Note the FY Budgeted Amount in the Fiscal Year Budget Information section. To submit a POCR, the full amount must be allocated when modifying a budget.
-
Scroll down to the Detailed FY Budgets section. This is where you modify the budget.
5. Modify the Budget
To make changes to your budget, you have three options:
- Void Budget Lines for lines you no longer need.
- Add New Budget Lines for new budget entries.
- Download Budget Template and Upload Budget for bulk entries.
Important: Before making any changes, consult your contracting agency's fiscal manual on allowable budget modifications.
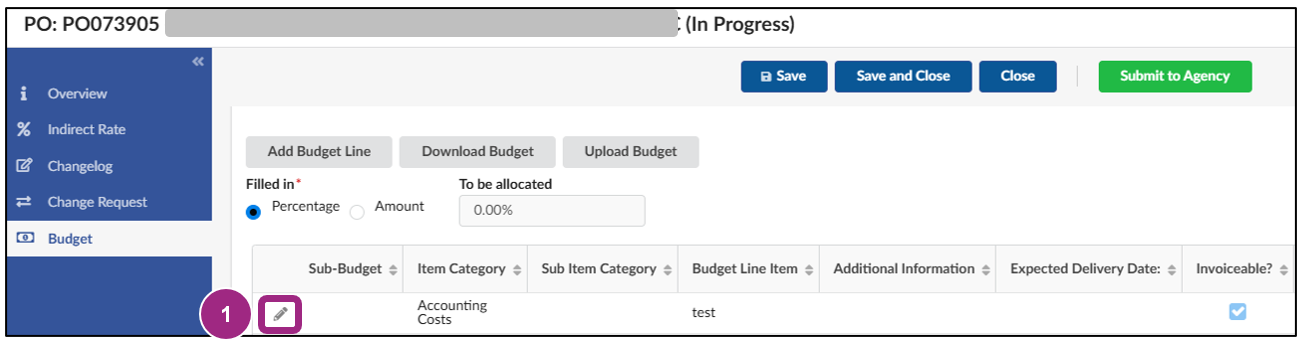
a. Void Budget Lines
-
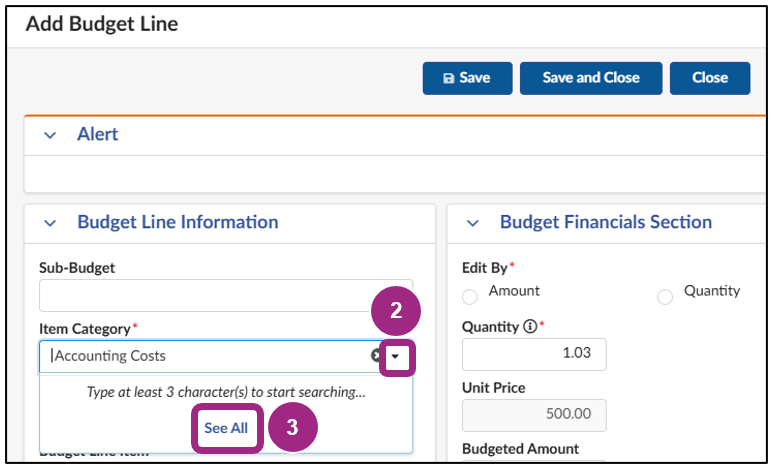
Go to the Detailed FY Budgets section and click the pencil icon.
- In the Add Budget Line window, click the Item Category field drop-down. The menu will expand
-
Click See All. The Item Category (Budgets) window appears.
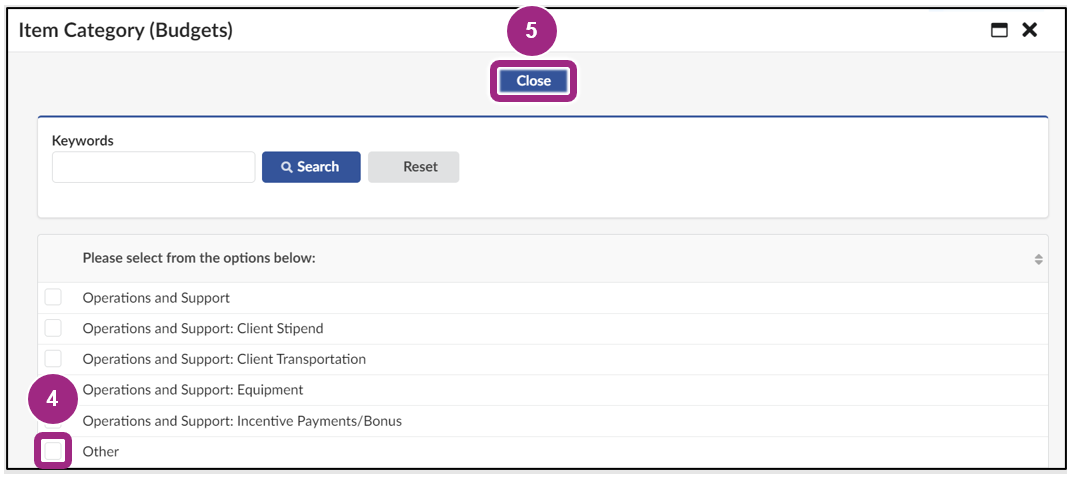
-
Click the checkbox to select Other from the Item Category list.
Tip: You can also type in the first few letters of the category “Other” to quickly locate it.
-
Click the Close button.
- In the Budget Line Item text field, type: “Void Line”.
- Click the radio button to select Quantity. Do not select Amount.
-
Enter “0” in the Quantity field.
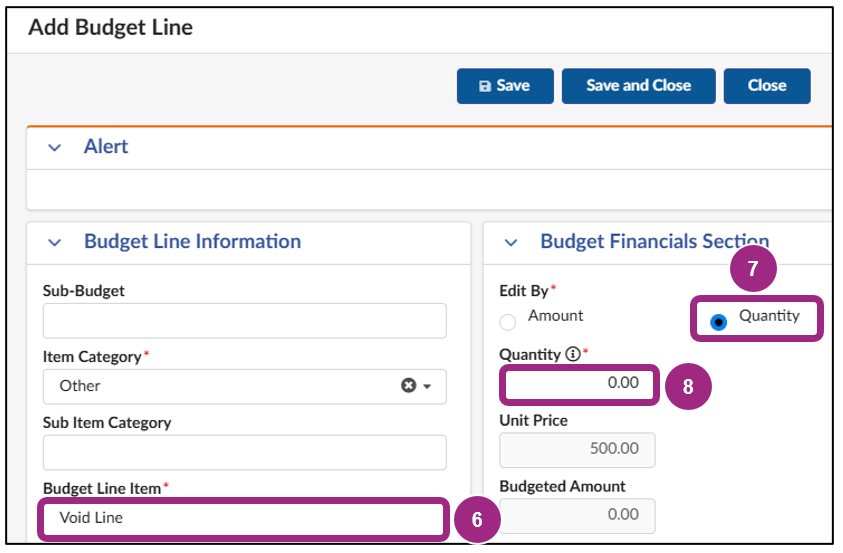
-
Click the Save and Close button.

The budget line will update and now display for the contracting agency as “Void Line”, indicating that you would like for this line to be deleted.
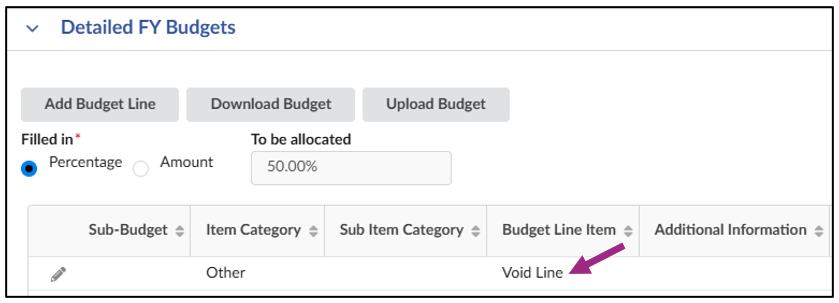
Repeat steps, as needed.
Important: Budget lines that have been invoiced against cannot be voided. See Invoiced Amount column of the budget line. The remaining amount on a used budget line can be removed, but one cannot void it if there are disbursed invoices against it.
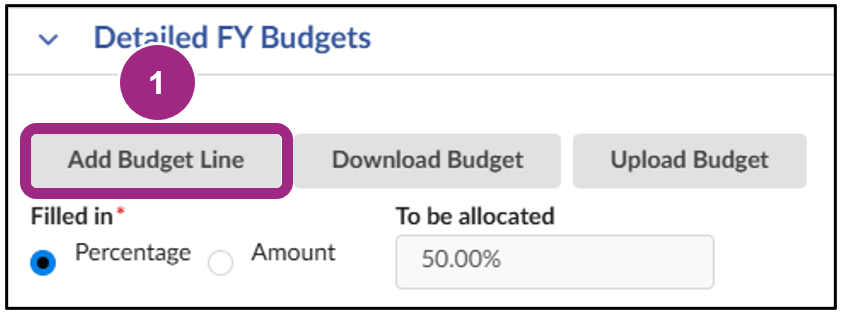
b. Add New Budget Lines
-
Click the Add Budget Line button.
-
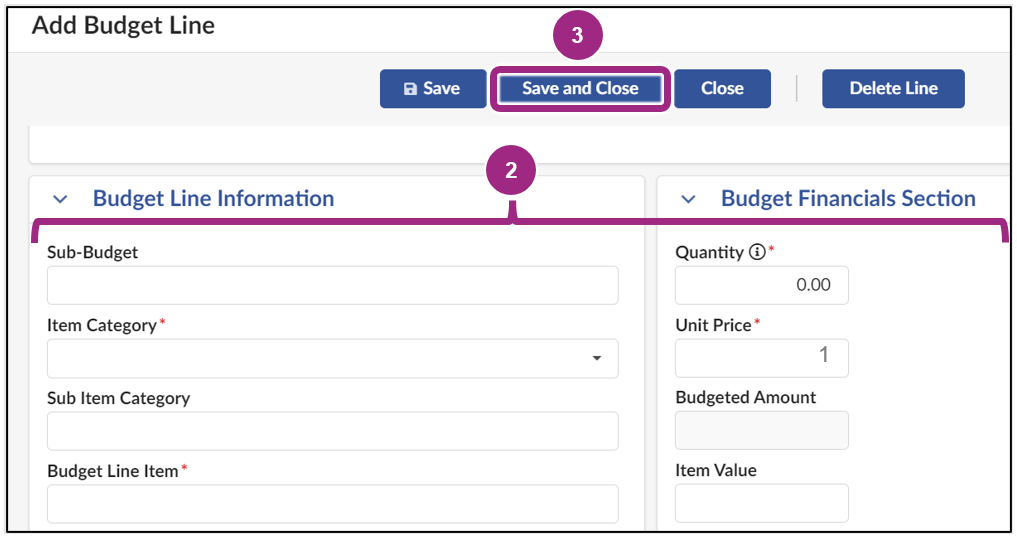
The Add Budget Line window is where you enter the budget details:
- Item Category: Select the appropriate category to define the deliverable of the budget line. Note: If a category is not listed in the drop-down, select "Other" instead. Keep in mind that for Human/Client Service contracts, selecting the correct item category is crucial because the indirect rate calculation is driven by the information entered in the item category.
- Sub Item Category: While this is an optional field, some agencies require that you complete this field. Refer to agency guidance.
- Budget Line Item: Provides further detail to the deliverable. Type in a label.
- Quantity: The amount budgeted towards the goods or services described by the line.
- Unit Price: Should always be “1”, unless it is a rate-based line such as wages.
Note: Once you enter the unit price and submit, it cannot be edited.
Important:
- The Unit Price should always be “1” unless it's an hourly rate.
- When budgeting wages, enter the projected number of hours to be performed in the Quantity field and enter the hourly wage in the Unit Price field. For salaried full-time employees, in contrast, enter in the full dollar amount in the Quantity field and enter “1” in the Unit Price field.
- The Item Value field should always be left blank.
- The checkbox next to Invoiceable? is not editable. That's because the agency will have the final say on which lines will be marked invoiceable after you submit the budget.
-
Click the Save and Close button.
Repeat steps, as needed.
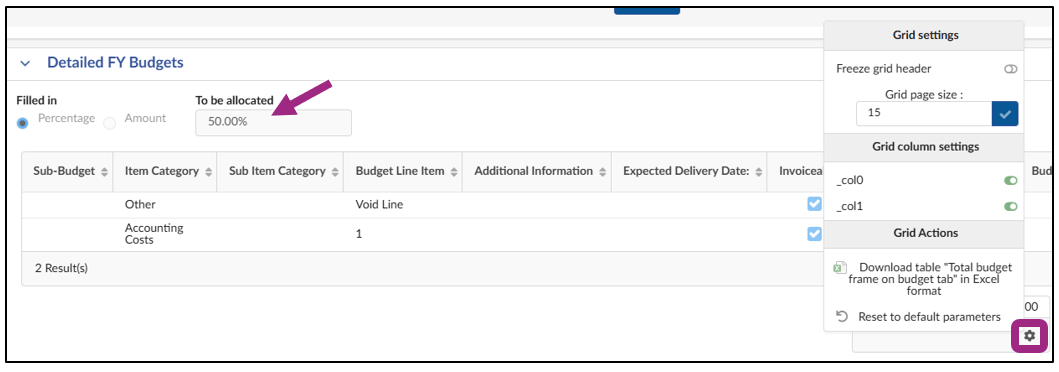
Tip: Keep an eye on the To be allocated field—it shows the remaining budget you still need to allocate. You can also click the gear icon to download the table's contents for your records.
c. Download Budget Template and Upload Budget
-
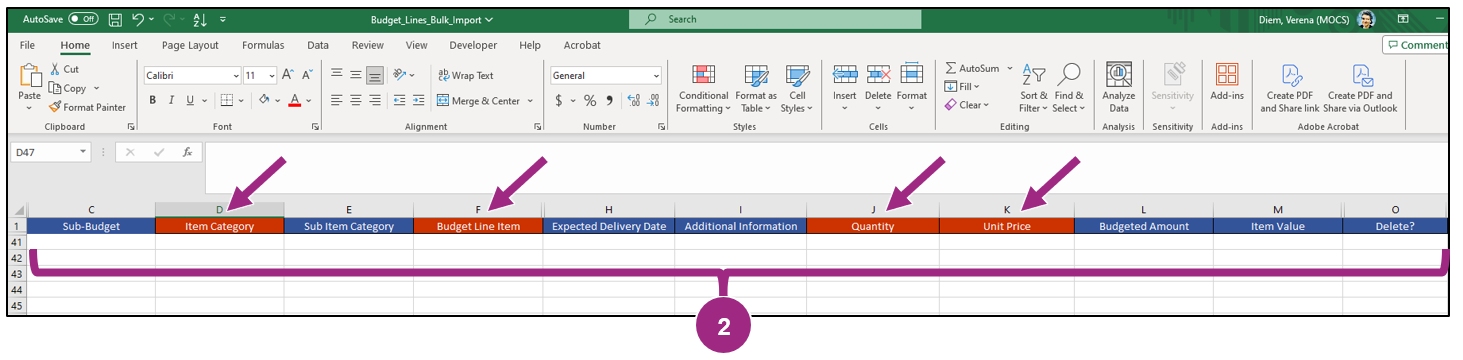
Click the Download Budget button.

A template will download to your computer. Make sure there are no pop-up blockers set up in your web browser.

-
Open the Excel file and enter budget line information according to the column labels.
Columns marked in red indicate required fields. Save the file to your computer.
-
Upload the spreadsheet in PASSPort:
-
Click the Upload Budget button.
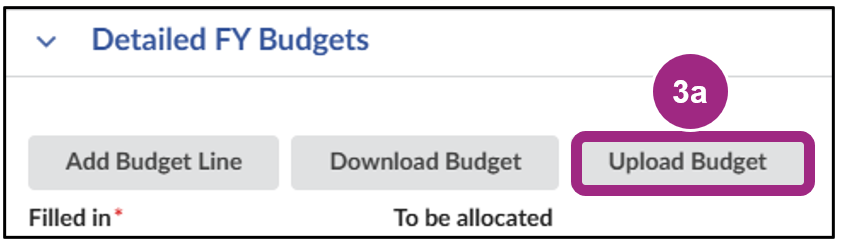
- Click the Click or Drag to add a file button to add the budget template file and follow the prompts.
-
Click the Upload button.

-
Click the Upload Budget button.
To add individual budget lines, refer to the instructions listed in Add New Budget Lines.
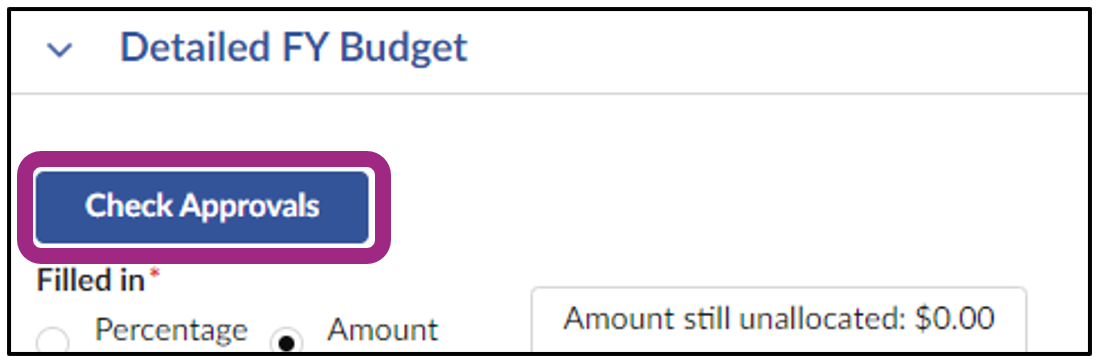
6. Check Approvals
For POCRs, in the Detailed FY Budget section, the Check Approvals button displays.
You can use it to check if your intended budget changes qualify for auto-approval.
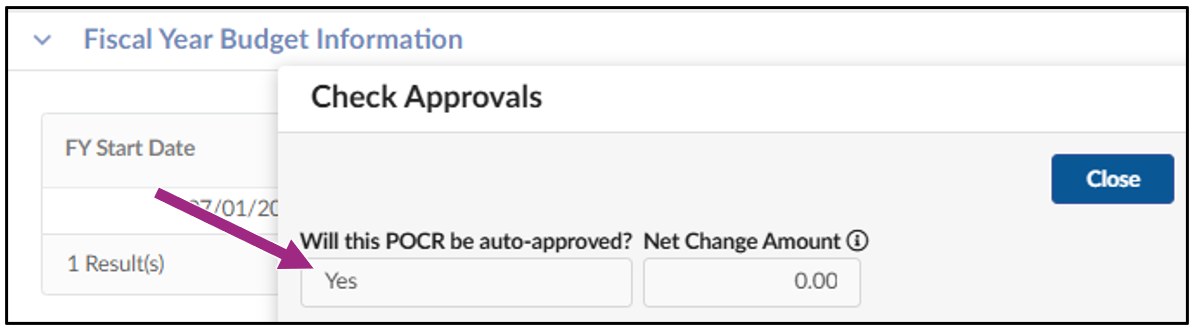
To expedite the approval process, new budget lines valued at less than 10% of the total fiscal year budget are typically auto approved, meaning they do not require manual approval by your contracting agency. Changes exceeding 10% require manual review and approval by the agency.
Click the Check Approvals button to view whether the changes qualify for auto-approval:
- Yes. This means your changes do qualify for auto approval. The changes do not exceed the agency's auto-approval threshold and will be auto approved in PASSPort, meaning manual approval by your contracting agency is not required. Note: If the initial POCR doesn't use the full threshold amount, the remaining balance can be applied to another budget-only POCR.
- No. This means your changes do not qualify for auto approval. The changes exceed the agency's auto-approval threshold which means that manual budget approval is required by the contracting agency.
Example:
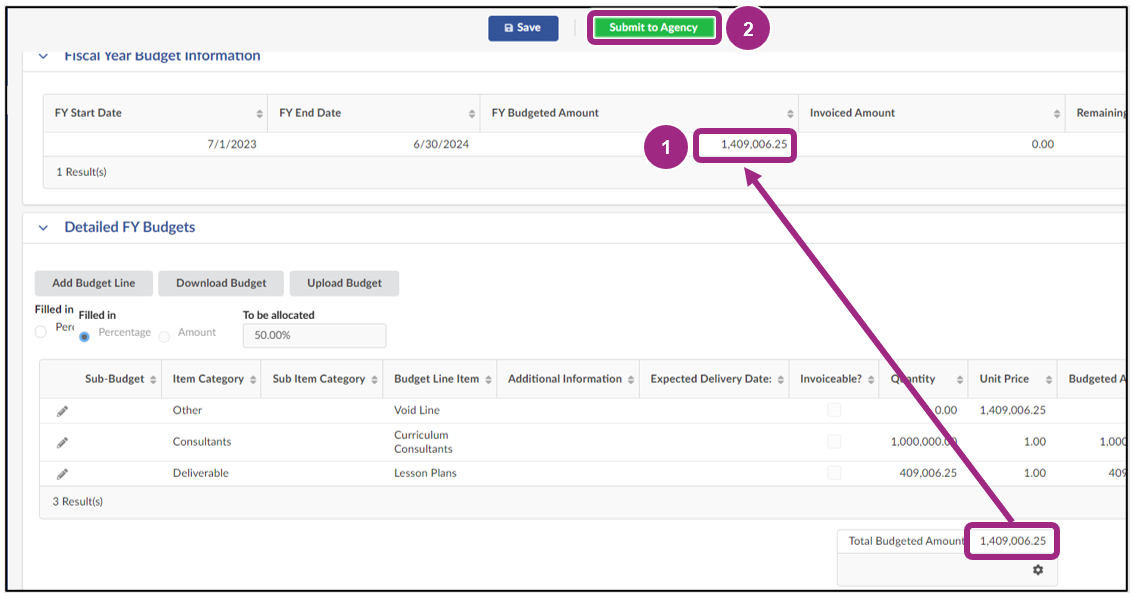
7. Submit the Budget Modification
- Make sure the Total Budgeted Amount is the same as the FY Budgeted Amount.
-
Click Submit to Agency button at the top of the page to submit the POCR.
-
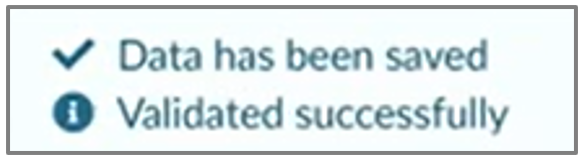
Look out for this validation message. It confirms successful budget submissions.
8. Next Steps
- The contracting agency may either approve the budget or return it for revision.
You will receive an email notification if the budget was returned for revision. - If the agency approves your budget, the POCR status will change to Registered and the underlying Active PO will be updated with your changes.
Note: Take note of your Active Purchase Order's PO ID. Both Purchase Orders and Purchase Order Change Requests use PO IDs as their unique identifiers. However, invoices can only be made against Active status Purchase Orders.
Last updated: July 1, 2025