


Requirements Contracts: Vendor Catalog Management
Learn how to upload and manage your goods catalog in PASSPort.
Before We Begin
Users provisioned with the following roles can import a catalog into PASSPort:
- Vendor Admin
- Vendor Procurement L2
Users provisioned with the following roles can search for and view an imported catalog in PASSPort:
- Vendor Admin
- Vendor Procurement L1
- Vendor Procurement L2
- Vendor Financials L1
- Vendor Financials L2
Overview
Any goods a vendor offers the City under their Requirements Contract can be loaded into an online goods catalog in PASSPort, creating one central location for agencies to purchase items and receive invoices.
Vendors currently doing business with the City of New York via the Department of Citywide Administrative Services (DCAS) requirements contracts are encouraged to complete the Catalog Management process, which involves:
- Creating a PASSPort account.
- Ensuring at least one Vendor Contact is assigned the appropriate role to manage Catalogs in PASSPort. See Add Users and Assign Roles.
- Importing the organization's Goods Catalog into PASSPort.
Once a Catalog is imported and approved, vendors can manage their imported items by reviewing, editing, and expiring these items in PASSPort.
Note: Any changes made to the Catalog items will require additional agency approval. The purchasing agency can then use this information to easily create Requisitions and purchase items from vendors.
Import a Catalog
PASSPort allows users provisioned with Vendor Admin or Vendor Procurement L2 access to import Catalogs as necessary. Once the Catalog file is imported, DCAS will review the import to ensure all data matches the agreed terms and details for each item. If DCAS finds any discrepancies or there are any issues with the file, they will reject the submission in the system. This will trigger an automated email alerting the initial importer to review and reupload the catalog. See the Catalog Template Description for a description of each field in the Catalog template.
- Click Catalogs in the top navigation menu
- Select Import Catalog from the drop-down.
-
Click the + Add a New Catalog Import button.

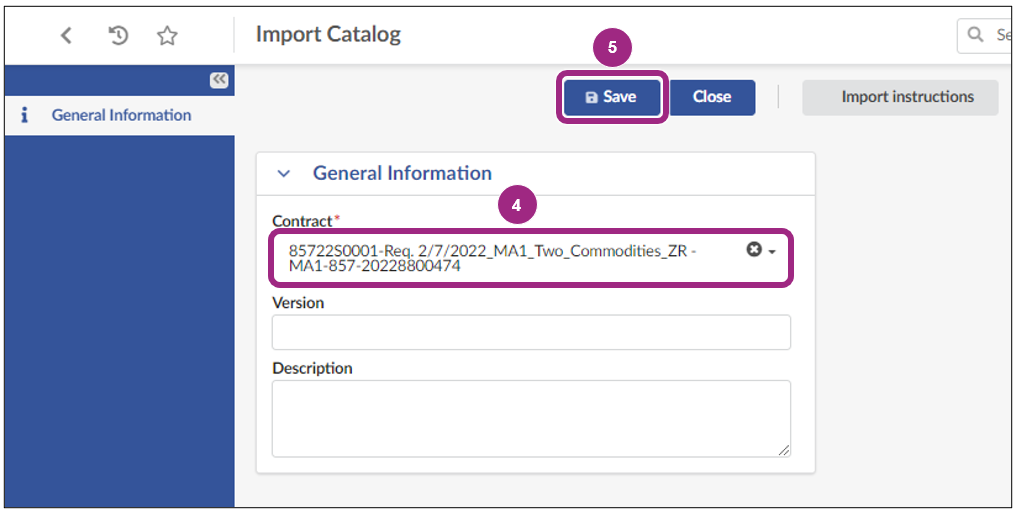
- In the Contract field, select a contract from the drop-down menu.
-
Click the Save button.
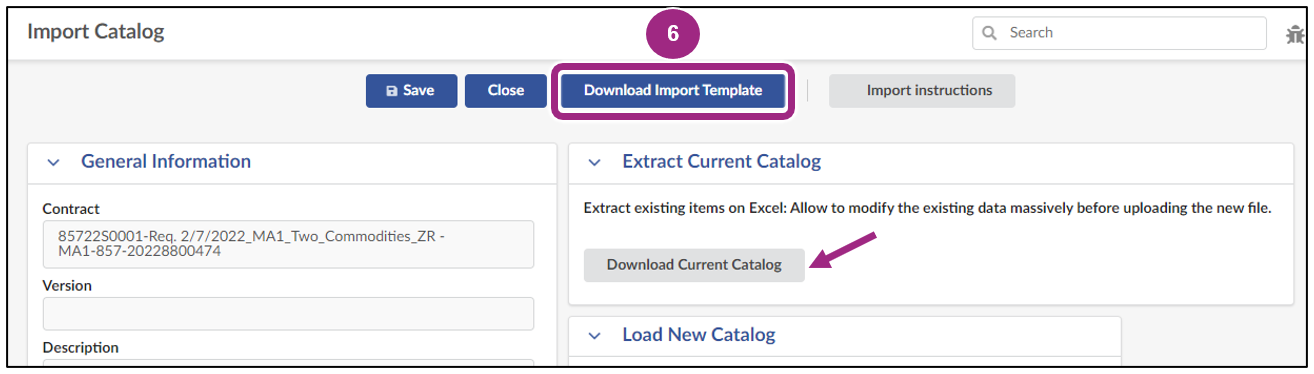
-
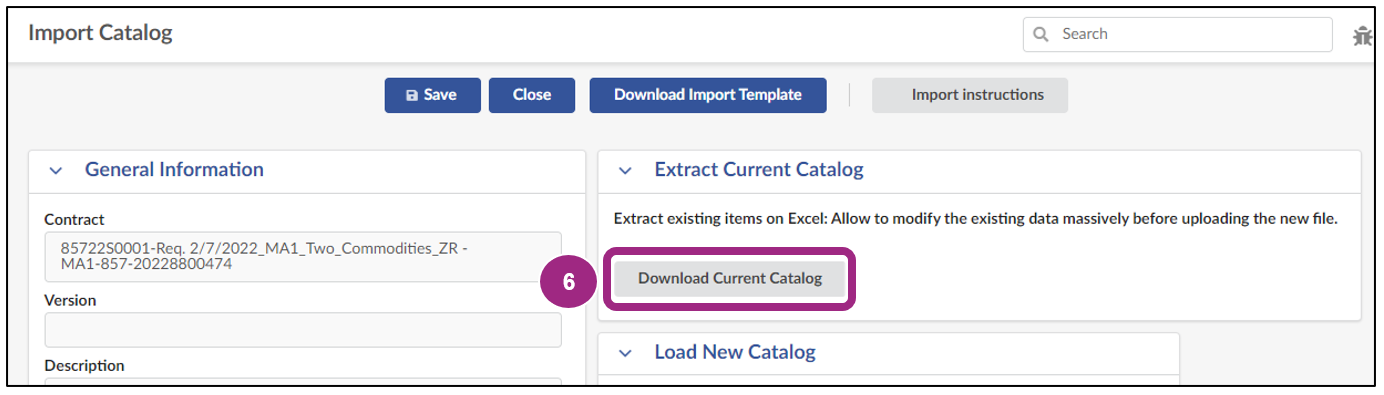
Click the Download Import Template button.
Note: If this is not the first time importing a Catalog and there is already a Catalog uploaded for the organization, scroll to the right of the page and click the Download Current Catalog button.
-
Add updated or new items to the Catalog template and save the file to a computer. Review the Catalog Template Description section of this guide for more details on required columns.

Tip: Images cannot be uploaded by adding them to the template directly. Instead, create a folder on a computer and save the template within the folder, along with all associated images. Then, zip the folder. If uploading a zip folder with images, that image file name must match exactly what is in the template (Image field) for images to upload successfully.
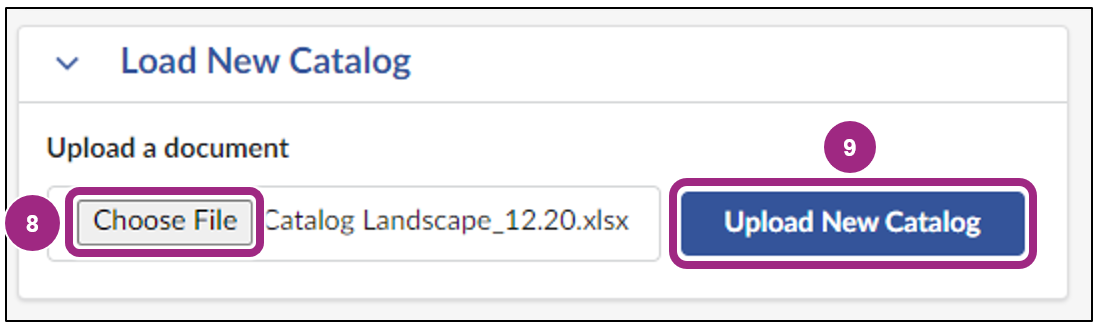
- In the Load New Catalog section, click Choose File to search for and select the Catalog file that should be uploaded. If images are being uploaded, be sure to search for the zipped folder containing both images and the template.
-
Click the Upload New Catalog button. A new section named File(s) will appear.
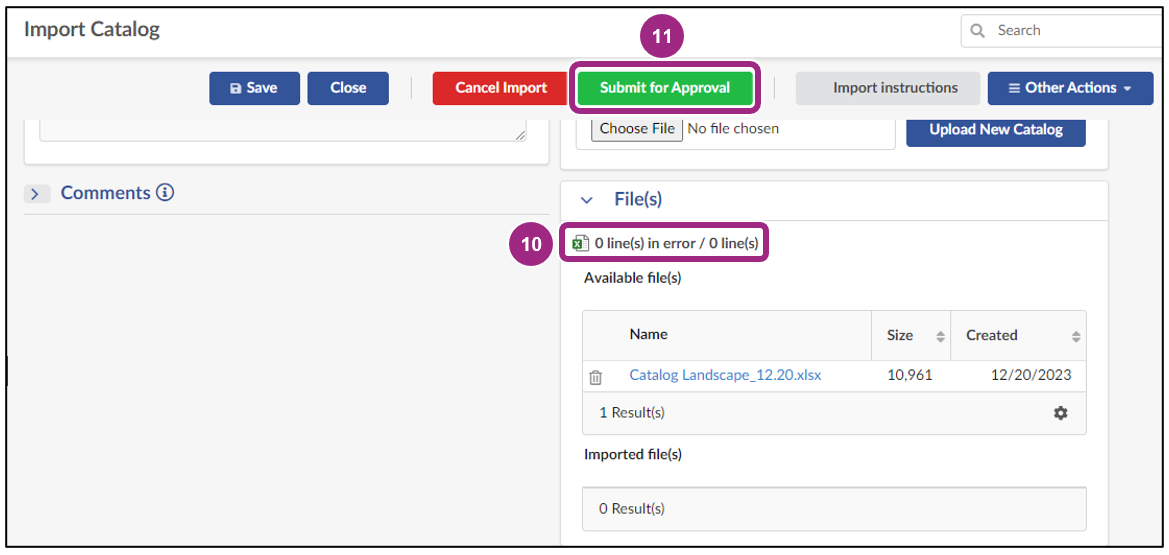
- In the File(s) section, check if there are any errors appearing: 0 lines(s) in error / 0 line(s).
Important: Any errors should be corrected before submitting the catalog for approval. -
Click the Submit for Approval button.
The Catalog has now been submitted to the agency for approval. If the import is rejected, the Catalog will be returned to the import initiator for revision.
Catalog Template Description
The table below contains the fields and description of a Catalog template. All field names marked with an asterisk (*) are required fields.
| Field | Description | Notes |
|---|---|---|
| Product Code* | Code of the product the item is attached to. |
For a contract, each item requires a unique code. The same code should be listed in the “product_code” and “item_code” fields. Codes are alphanumeric and don't include spaces. |
| Product Label | Name of the product. | Enter the same text in the “product_label” and “item_label” fields. |
| Commodity Type* | The type of commodity code (NIGP, UNSPSC, NAICS) that is entered in the commodity_code field. | |
| Commodity* | Commodity to which the item is attached. | For NIGP codes, enter the 5-digit code. For NAICS and UNSPSC, enter any level code. |
| Manufacturer | Vendor's internal/ERP code for the product. | |
| Link to Manufacturer Catalog | URL link to manufacturer catalog. | |
| Product Vendor Ref. | Manufacturer's reference code for the product. | |
| Summary | Summary of the Product the Item is linked to. | This summary will be visible to requestors while browsing the online catalog. |
| Keywords | Allows PASSPort to associate keywords with the product in order to facilitate searching in the catalog. | This field is critical in making an item searchable in PASSPort. When a requestor does a keyword search, PASSPort will be searching this field associated with each item. |
| Description | Description of the Product the Item is linked to. | From the browse screen, the requestor can click on an item to view the description. |
| Image | Name of product image file associated with the Product sheet. | |
| Document | Any specification file attached to the product. | Only 1 image per item. The exact file name of the image needs to be entered into this field (i.e. “stapler.jpg” for an image of a stapler). |
| Item Code | Code assigned to the item in the Price sheet. |
For a contract, each item requires a unique code. Enter the same code in the “product_code” and “item_code” fields. Use an existing product code or create a new one for PASSPort. Codes are alphanumeric and don't include spaces. |
| Item Label* | Label of the item in the Price sheet. | Enter the same text in the “product_label” and “item_label” fields. |
| Vendor Code* | Vendor proposing this item with the conditions written in the Price sheet. | |
| Vendor Contact | Email of the Vendor Contact. | |
| Item Vendor Ref. | Manufacturer's reference code for the item. | |
| Link to Supplier Catalog | ||
| Contract* | Reference for Contract associated with the item. | This information is provided in the email received from DCAS. |
| Account | General ledger account to which the item is attached. | |
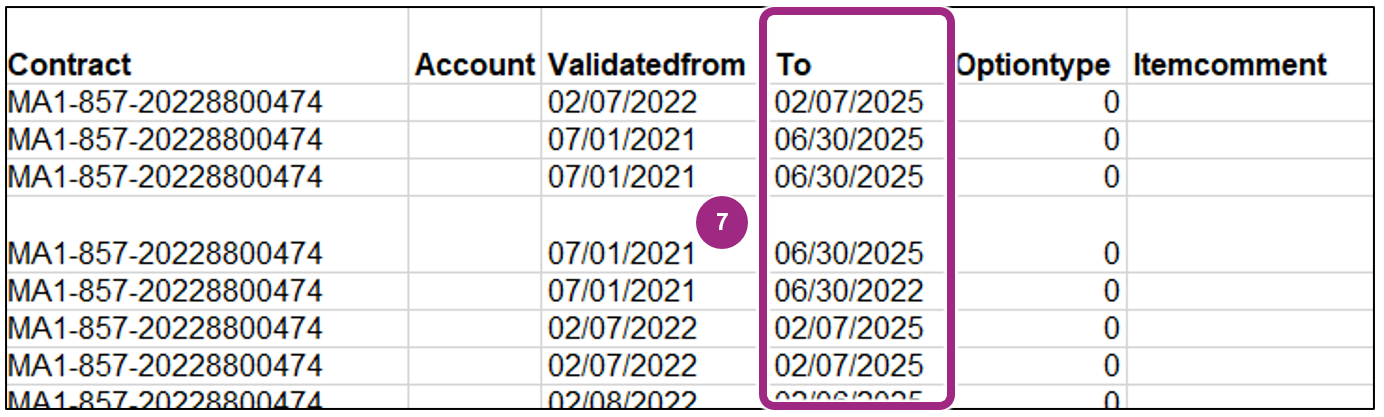
| Validated from* | Validity start date for the item. |
This date is the same as the start date of the contract. Use date format mm/dd/yyyy. |
| To* | Validity end date for the item. |
This date is the same as the end date of the contract. Use date format mm/dd/yyyy. |
| Option Type | Values: 0 or 1. 1 Indicates whether it's a regular item or an optional item that can be attached to other items. | Enter “1” if this is an option item that can only be ordered with other items. |
| Item Comment | Additional information for the item. | |
| Public Price* | Retail price for the item. | Do not enter a dollar sign. |
| Negotiated Price* | Negotiated price per the attached contract. | Do not enter a dollar sign. |
| Item Quantity A Negotiated | Negotiated quantity within the attached contract. | |
| Negotiated Price for Quantity A | 1st tier Negotiated price at the associated negotiated. | Do not enter a dollar sign. |
| Item Quantity B Negotiated | Negotiated quantity within the attached contract. | |
| Negotiated Price for Quantity B | 2nd tier Negotiated price at the associated negotiated. | Do not enter a dollar sign. |
| Item Quantity C Negotiated | Negotiated quantity within the attached contract. | |
| Negotiated Price for Quantity C | 3rd tier Negotiated price at the associated negotiated. | Do not enter a dollar sign. |
| Item Quantity D Negotiated | Negotiated quantity within the attached contract. | |
| Negotiated Price for Quantity D | 4th tier Negotiated price at the associated negotiated. | Do not enter a dollar sign. |
| Item Quantity E Negotiated | Negotiated quantity within the attached contract. | |
| Negotiated Price for Quantity E | 5th tier Negotiated price at the associated negotiated. | Do not enter a dollar sign. |
| Negotiated Quantity* | Negotiated quantity for the price quoted. | |
| Unit* | Unit used to count or measure the item. | |
| Other Units | Code for other units that can be used to count or measure the item. | |
| Packaging | Type of packaging used by the Vendor for this item. | |
| Lead Time | Delivery time announced by the Vendor (in days). | |
| Shipping Mode | Shipping mode for the item. | |
| Incoterm | Code for the Applicable Incoterm. | |
| Incopalce | ||
| Substitute Item | When an item is no longer available, a substitute item can be selected. | |
| Flexible Price | Populating 'Yes' will allow requestor to modify price on req and 'No' will not allow requestor to modify price on a req. | If an item's price is negotiable, select “yes” in this field. Selecting “yes” gives a requestor the ability to update the price when they are purchasing the item in PASSPort. |
| Discount | Negotiated prices and quantities. | |
| Warranty | Warranty specific to the item. | |
| Return Policy | Return Policy specific to the item. |
Browse Catalog
PASSPort allows users provisioned with the above roles to easily search for and view their organization's Catalog items after they have been imported. Follow the below steps to search for and review a previously imported Catalog.
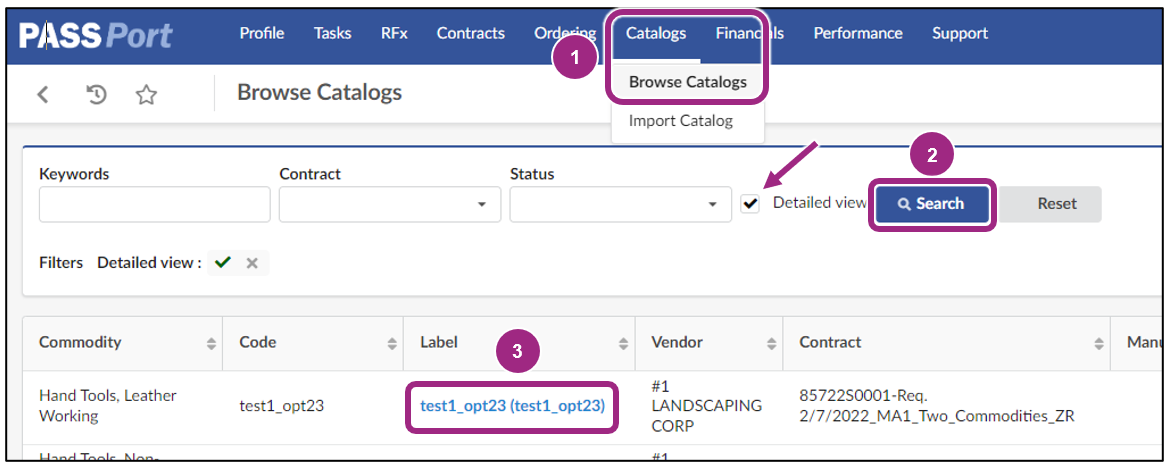
- Click Catalogs in the top navigation menu and select Browse Catalog from the drop-down.
- Once the search terms are entered, click the Search button.
Note: Select the Detailed View checkbox next to the Search button to access item details. -
Once the item is located, click the hyperlink under the Label column to open the item and view the item details.
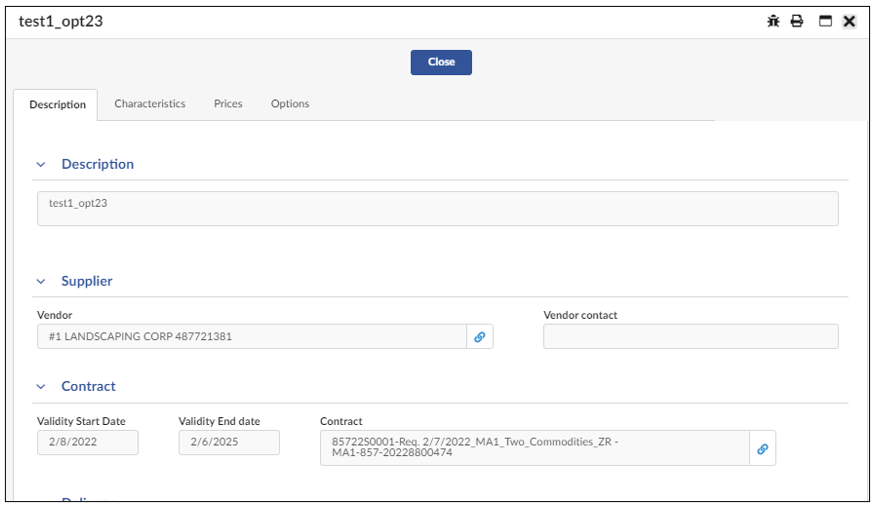
A pop-up will appear displaying the item's product information. On this page, the item's Description, Characteristics, Prices, and Options will be available for review. If provided, a photo of the item will also display.
Edit and Expire Catalog Items
Once an item is added to the Catalog, it will be available for purchase through PASSPort until the item's validity period ends as long as there are units available. If no validity period is assigned to the item, it can be purchased until the contract's designated end date.
While Catalog items cannot be edited within PASSPort after they are imported, if changes need to be made to an item, the details for each item can be adjusted by uploading the new information via the Catalog template.
Additionally, items cannot be removed from PASSPort; however, they can be manually expired if they should no longer be purchased from the Catalog. For example, if an item is no longer available, the item's end date should be updated to reflect the item's latest availability date.
To expire items, the validity period for each item should be adjusted on the Catalog template and reuploaded in PASSPort. This will ensure that agency users are not purchasing items that vendors can no longer provide.
Important: Changes to Catalog items will not be reflected in PASSPort until they are approved by DCAS.
Follow the steps below to edit a previously imported item.
- Click Catalogs in the top navigation menu.
- Select Import Catalog from the drop-down.
-
Click the Add a New Catalog Import button.
- In the Contract field, select a contract from the drop-down menu.
-
Click the Save button.
-
Click the Download Current Catalog button.
-
Edit the necessary fields in the current Catalog template and save the file to a computer.
Note: If an item needs to be expired, enter the updated end date in the To field. To expire immediately, select today's date. Then save the file to a computer.
Note: These dates cannot start prior to or end after the contract's validity period.
- In the Load New Catalog section, click Choose File to search for and select the Catalog file that should be uploaded.
-
Click the Upload New Catalog button.
-
Click the Submit for Approval button.

As with new Catalog imports, these changes must be reviewed and published by the agency before they will be visible in PASSPort.
How to Indicate Flexible Pricing in an Existing Catalog
On occasion, an agency and a vendor may negotiate a variable price point for a given item, typically based on conditions such as order quantity, total order cost, fluctuations in supply and demand, or levels of customization. Such items can be marked as flexible price items during the catalog import process. These items will then have price fields which can be modified by the agency Requestor during purchase. The vendor will be able to confirm the flexible price was entered correctly upon receipt of the Purchase Order. In the event a flexible price was entered incorrectly by the agency, the vendor will have the ability to reject the Purchase Order.
Note: This process only applies to hosted catalogs, and it is not applicable to PunchOut catalogs.
To indicate an item has flexible pricing, first, follow steps 1-6 in the Import a Catalog section. Then, follow the steps below:
-
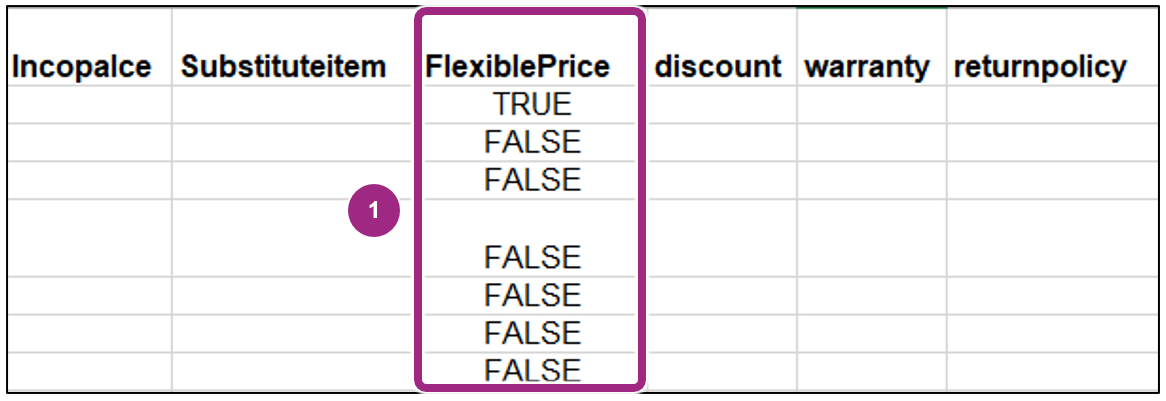
Locate the item(s) within the catalog spreadsheet and change the corresponding cell in the Flexible Price column to the value of True.
-
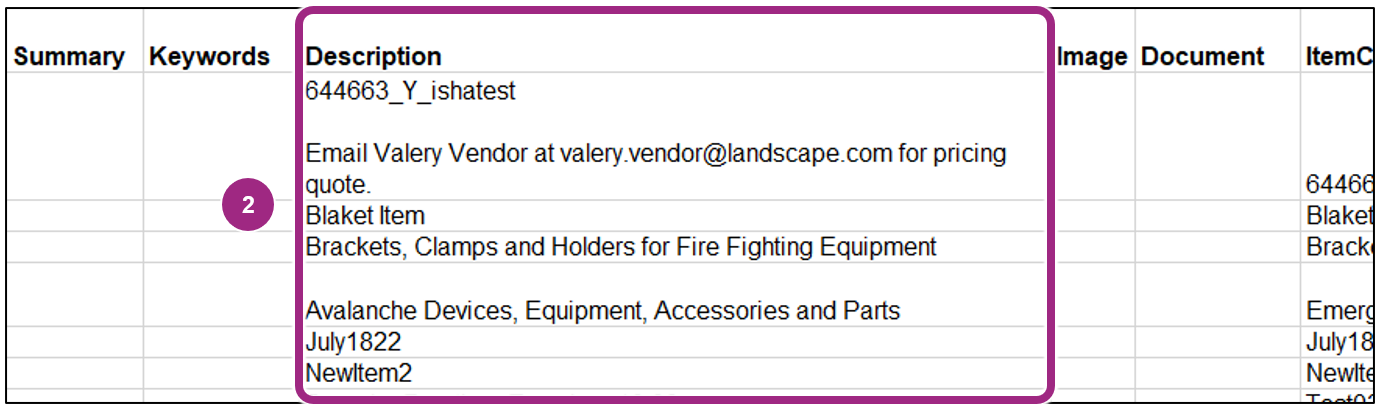
Find that item's corresponding cell in the Description column and enter in the contact information of the individual at the vendor organization who is familiar with the pricing terms of this item. Save the file to the computer.
Note: This individual will be contacted by an agency Requestor when the price is negotiated, and ultimately agreed upon, by both parties.
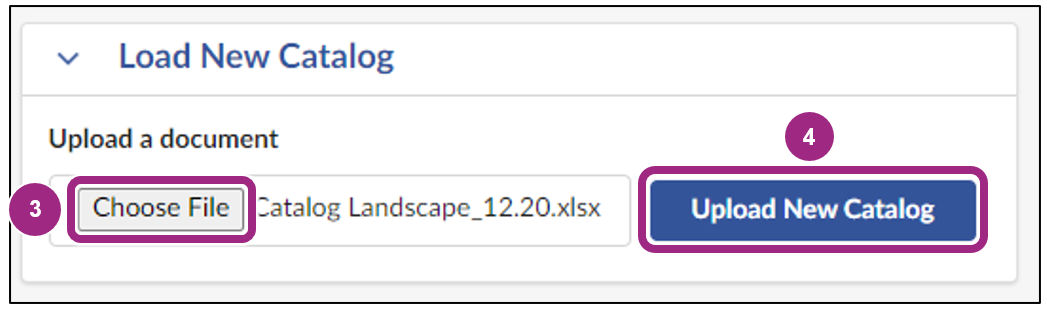
- In the Load New Catalog section, click Choose File to search for and select the Catalog file that should be uploaded.
-
Click the Upload New Catalog button.
-
Ensure there are no errors listed in the File(s) section and click the Submit for Approval button.

At the time of request, an agency staff member will reach out to the organization to discuss the terms of the price for the item(s) in question. Flexible price items may be subject to DCAS final approval.
Last updated: June 16, 2025