


HHS Prequalification Revisions: Resubmit the Financial Document
MOCS reviews all HHS Prequalification (PQL) Applications and gives vendors details as to what revisions are needed for HHS PQL approval. Vendors who have their HHS PQL application returned for revisions are commonly required to revise and resubmit the Financial Statement or Report in the Documents tab. This guide goes over common revisions reasons and how to revise them.
Before we begin
The steps below can be completed by users provisioned with the roles:
- Vendor Admin
- Vendor Procurement L1
- Vendor Procurement L2
Reasons for Returned Required Documents
There are some common reasons an HHS PQL Application is returned to vendors. The reasons below are specific to the Financial Statement or Report in the Documents tab. Vendors will find that they may need to address one or all of the following concerns for their Financial Statement or Report:
- Incorrect Start and/or End Date of Financial Statement or Report.
- Dates within the Charities Filing (CHAR500, 990, and Audit) do not align or are incorrect.
- Date missing next to signature in Charities Filing (CHAR500).
- Date and signature missing in Charities Filing (CHAR500).
To solve these, it is important to first unlink the existing document in the PQL application, then upload a new file, link a new file from the Vault or change the validity dates on the current document.
Access Manage Documents
Go to your returned HHS Prequalification Application to access the Documents tab's Manage Documents section and make revisions to returned documents. Vendor Admin and Vendor Procurement L2 can complete all the actions in this section and guide.
Note: Users with Vendor Procurement L1 may only complete the steps in this section after the PQL application is returned to Vendor L1 Draft.
-
From the PASSPort Homepage, or anywhere in PASSPort Central, click (or hover over) RFx in the top navigation and select Browse Prequalified Lists from the drop-down menu.
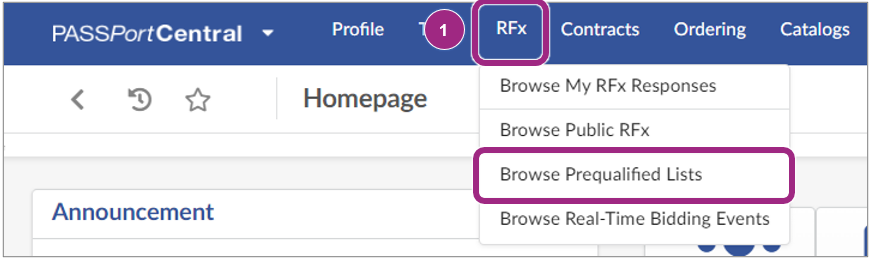
The Browse Prequalified Lists page displays.
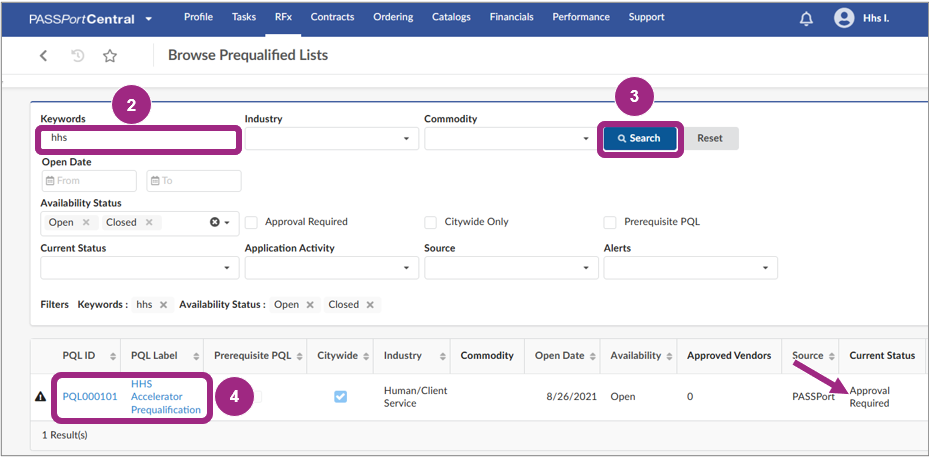
- To search for the HHS Accelerator Prequalification list, type “101” or “hhs” in the Keywords field.
-
Click the Search button and the list will display in the table below the search parameters.
-
Click the PQL ID or PQL Label to view the returned HHS PQL application.
The HHS PQL Application appears showing the Overview tab.
-
At the bottom of the PQL's Overview tab, the Vendor Status section shows the Application ID, Current Status, Application Activity (in this situation Returned) and the Qualification Expiration Date.
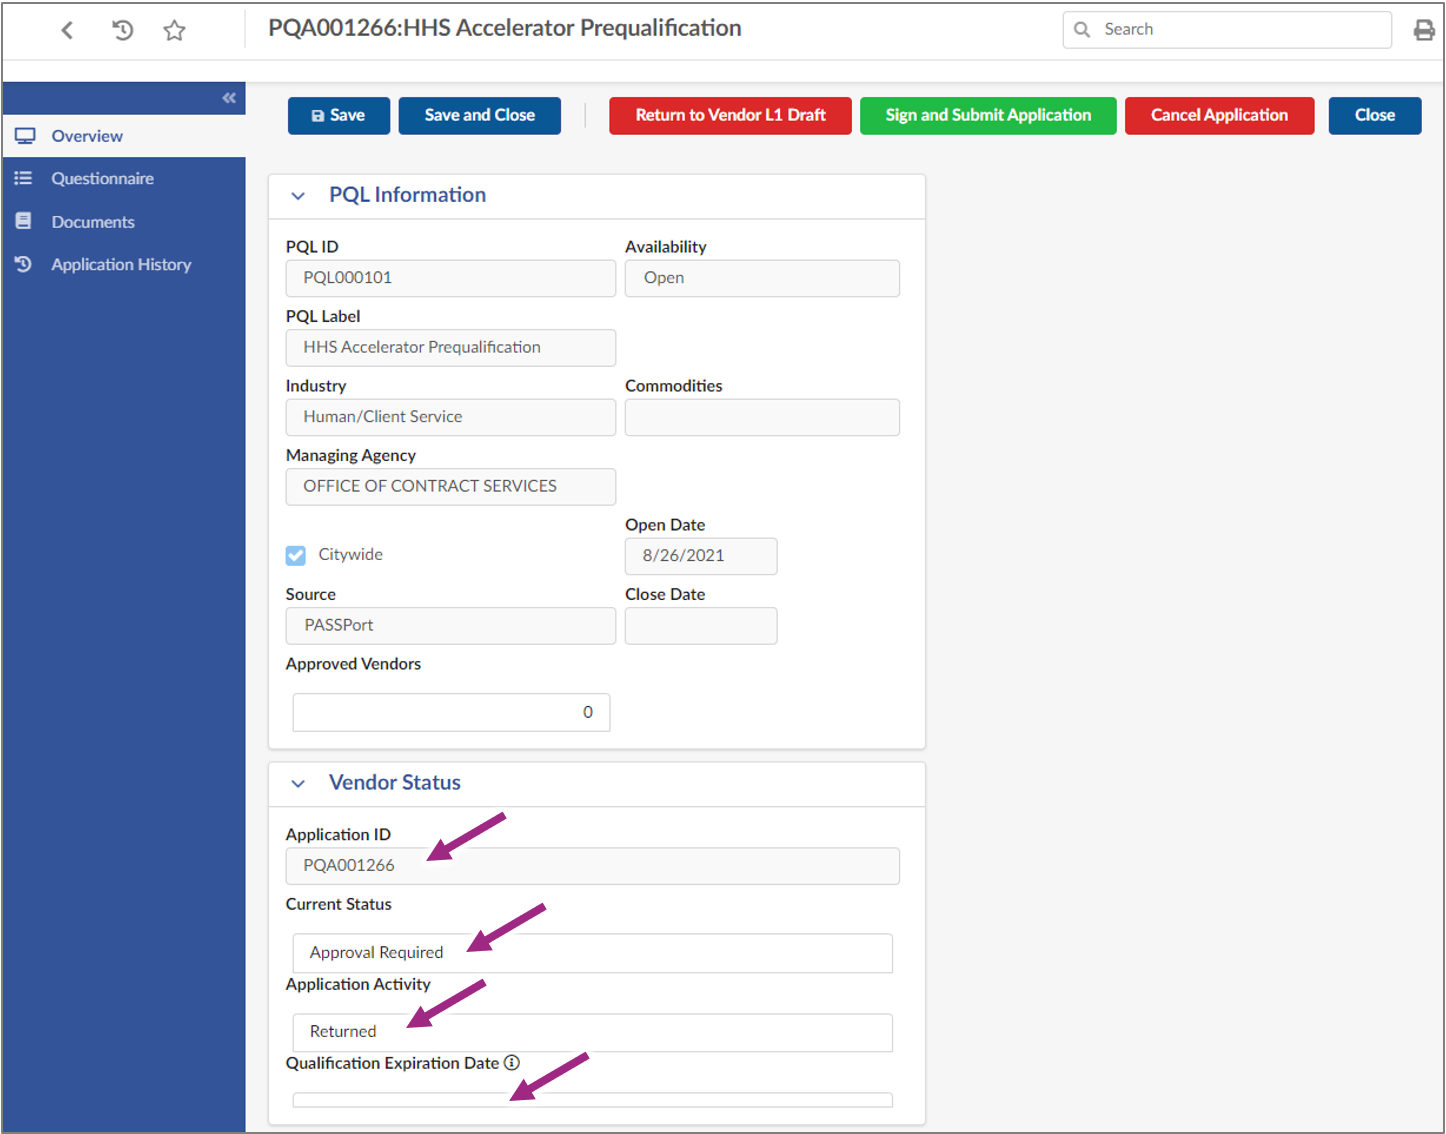
- Click the Documents tab in the left navigation to view the Required Documents section.
-
Click the Return to Vendor L1 Draft button at the top of the page to edit this section.
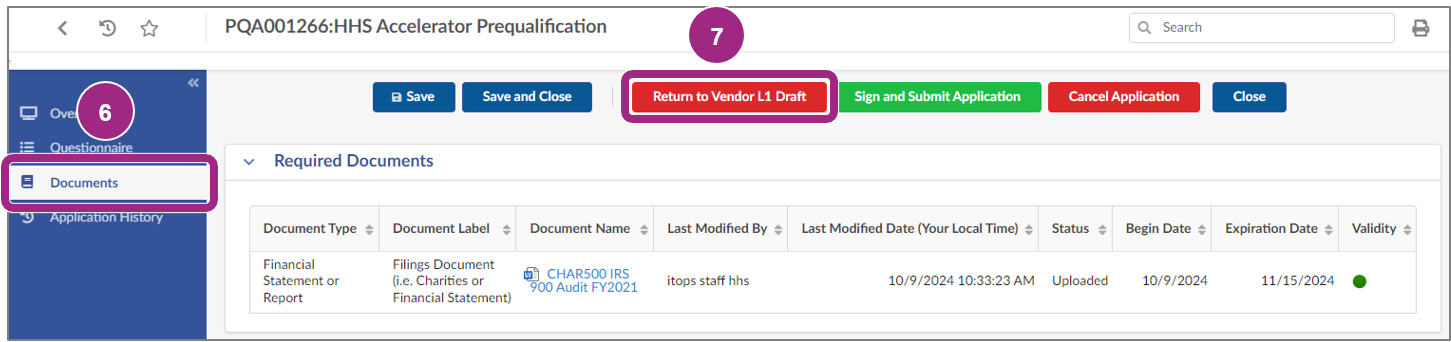
The page will refresh and the Manage Documents button becomes visible above the Required Documents section.
-
Click the Manage Documents button to edit Required Documents in this PQL application.
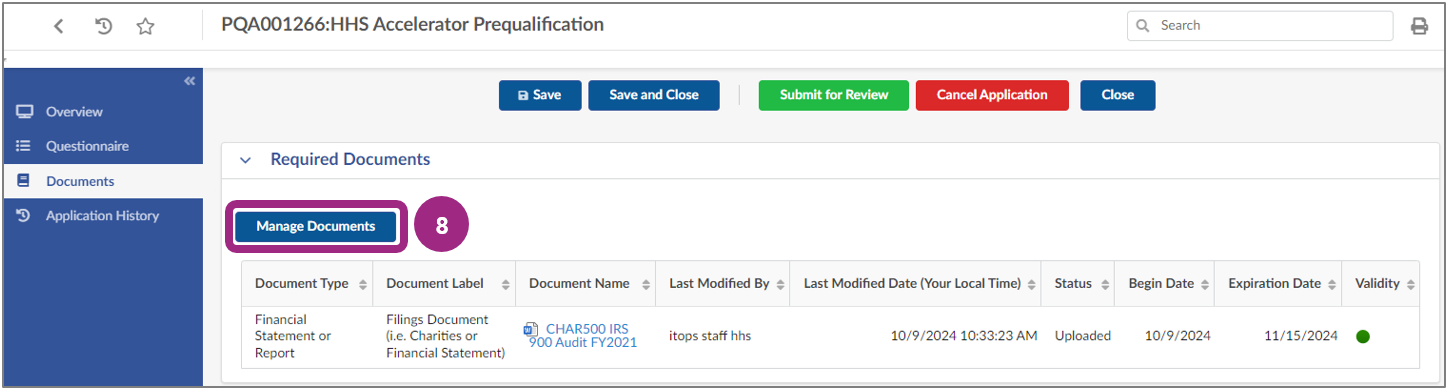
-
The Manage Document window opens. Here you will be able to unlink and replace the current required document attached to the application.
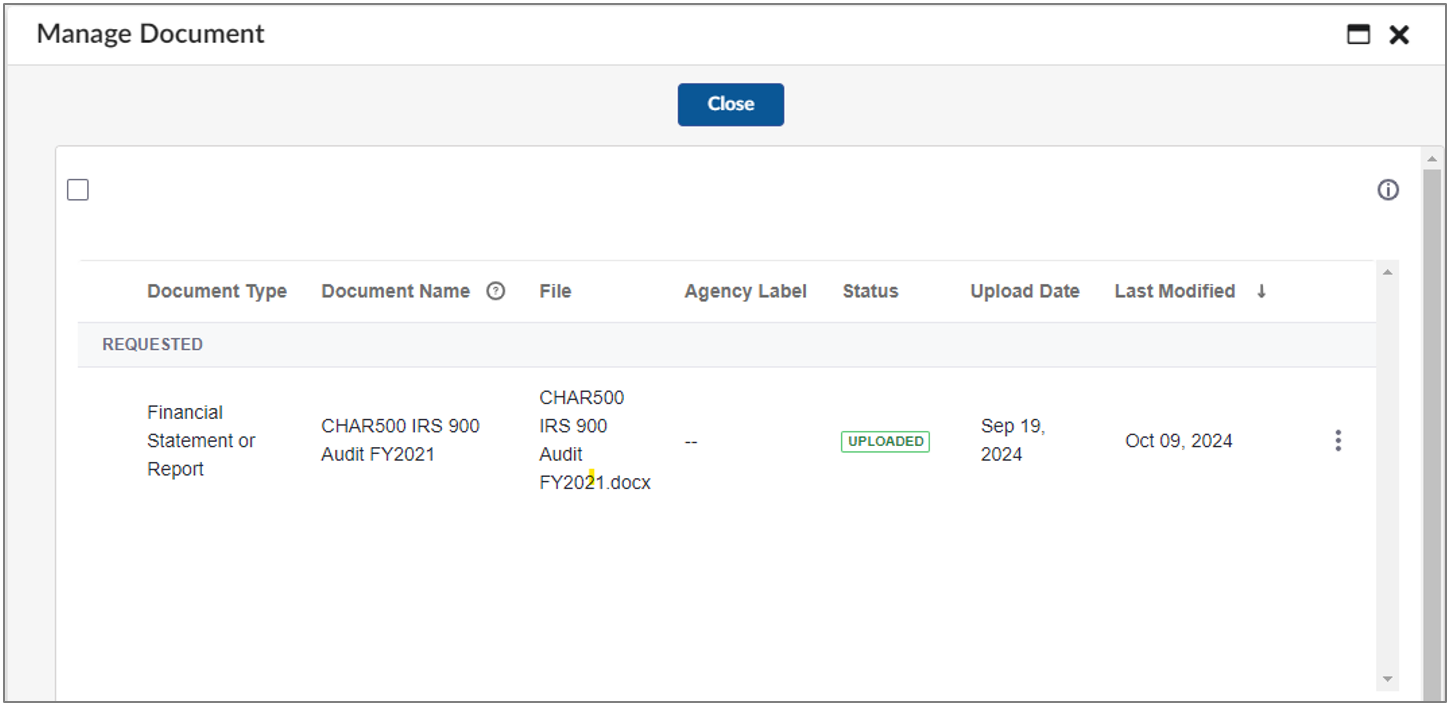
Unlink a Document
The Manage Document window enables vendors to remove a document from their returned HHS PQL application. This process is called unlinking. After the returned document is unlinked, you may proceed with replacing the document and editing the Validity period.
Follow the steps below to unlink the current document from the PQL application.
- Follow the instructions in the Access Manage Documents section of this guide to open the Manage Document window.
-
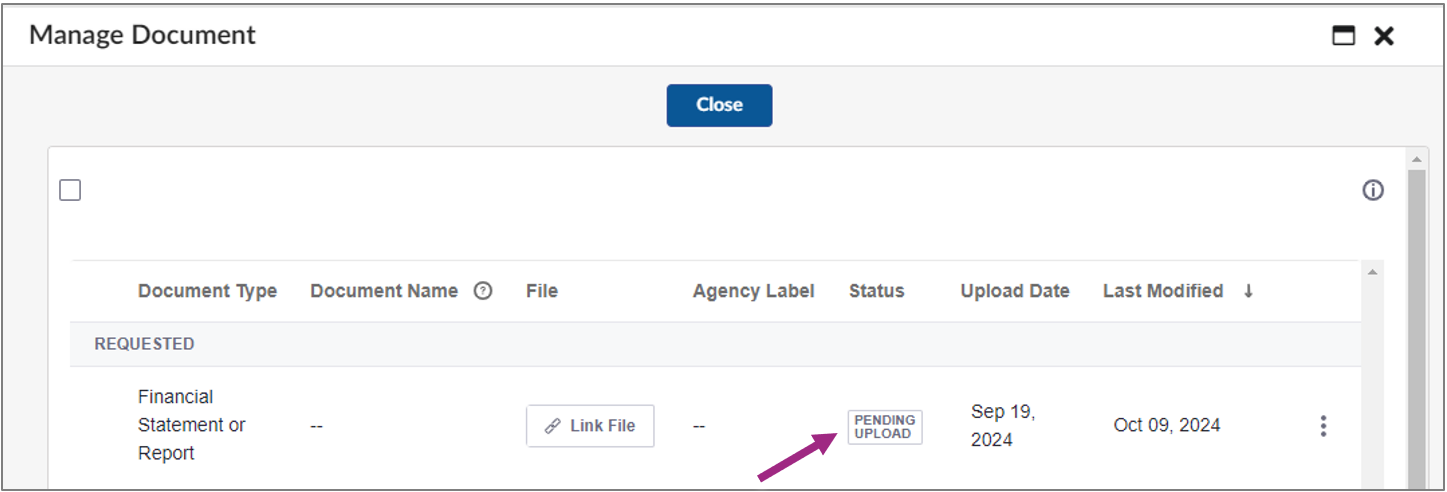
To unlink your document, click the vertical ellipsis (3 dots) to the right of the document's Last Modified date. Click Remove Linked File from the drop-down menu.
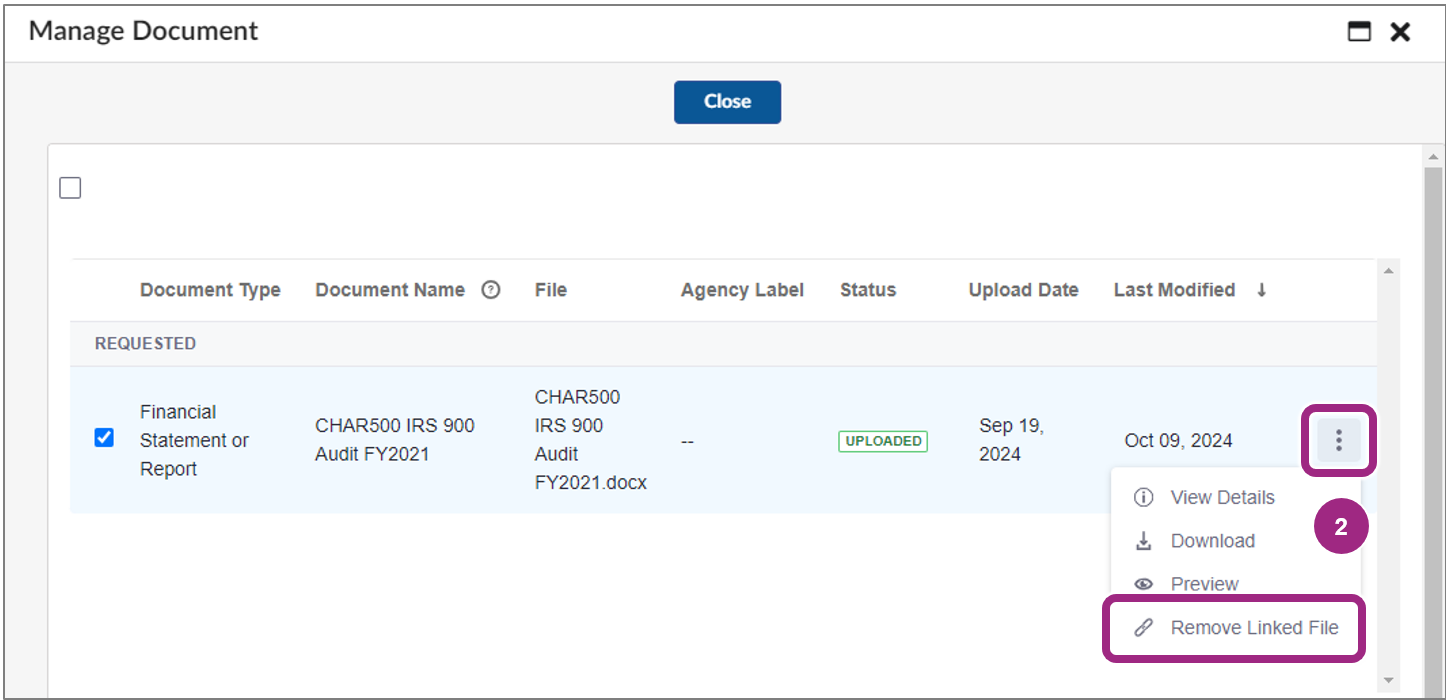
A pop-up window appears to confirm whether you wish to proceed with unlinking the document.
-
Click the Unlink Item button to proceed with unlinking the document from the PQL application.
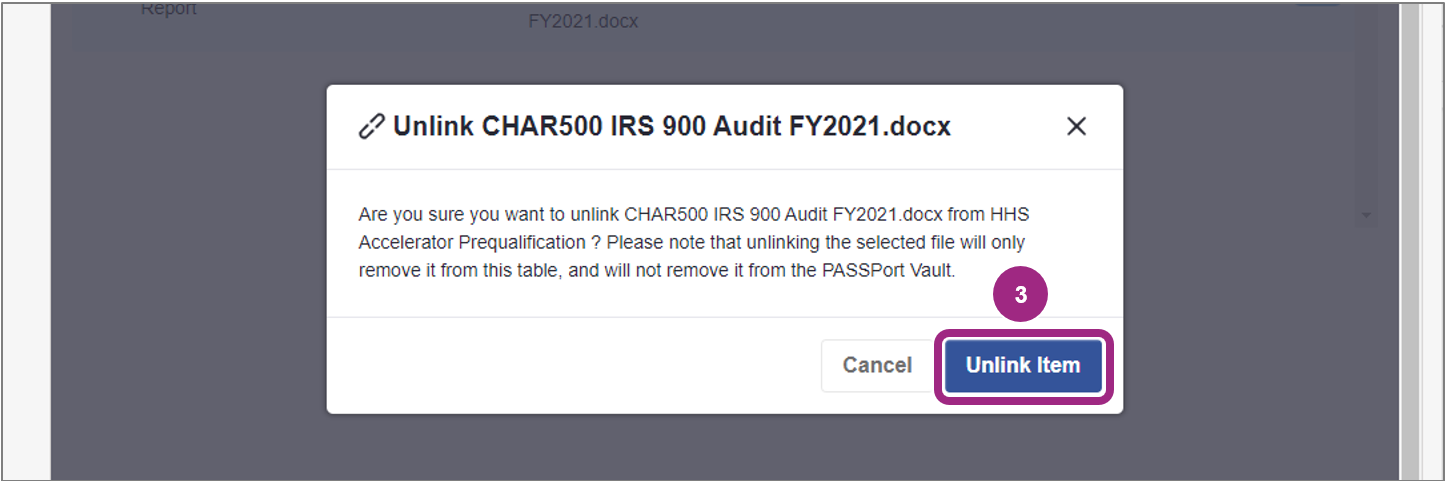
The pop-up disappears and the Manage Document window becomes visible again.
-
The Requested Document's Status becomes Pending Upload meaning it is now possible to proceed with adding a new Financial Statement or Report via the Link File button.
Add a New Required Document
After unlinking the incorrect document, it's time to replace it with the correct document in one of two ways:
- Link a different document from the Vault, or
- Upload a document from your computer
Important: Before proceeding, make sure the new document addresses all concerns raised by your MOCS Reviewer.
Option 1: Link a Document Via the Vault
Choose this option when you have the corrected Financial Statement or Report already in your organization's PASSPort Vault. Follow the instructions below to link that file to your PQL Application.
-
Click the Link File button, then select Link from PASSPort Vault from the drop-down menu.
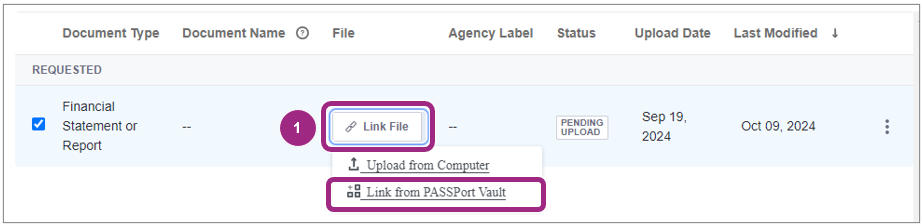
The Link from PASSPort Vault window appears.
-
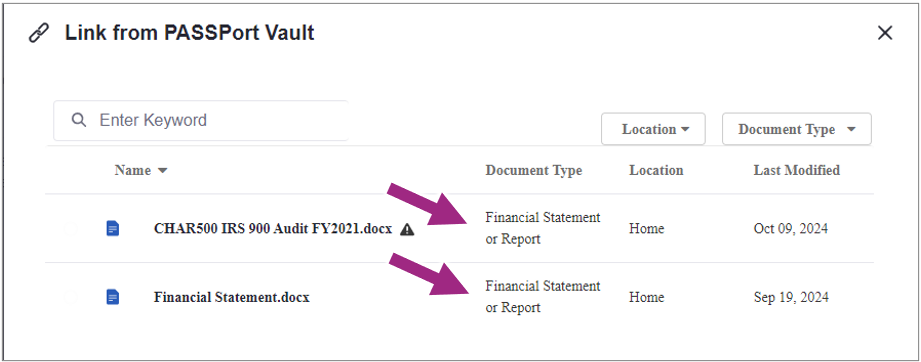
The documents available for linking from the PASSPort Vault will only include documents classified by the document type Financial Statement or Report. The image below shows there are only 2 documents in the Vault with this document type.
-
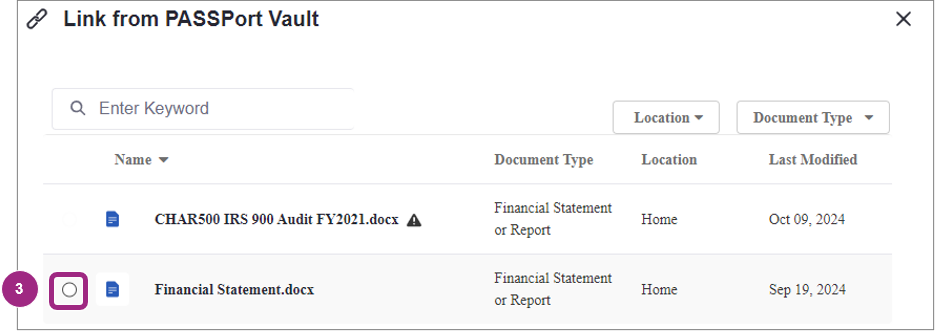
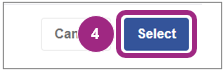
Move your mouse over the document you want to link. A radio button will appear to the left of the document's icon and Name. Click the radio button to select the document.
Tip:The radio button displays only when the mouse moves over the area to the left of the file icon. Once it becomes visible it can be clicked.
-
Click the Select button located to the bottom right of the same window.
The page refreshes and returns to the main Manage Document window.
-
Review and verify the Document Name, File (displaying file name and extension) and new Status (now Uploaded). Reconfirm that the new document addressed all concerns raised by your MOCS reviewer.

At this point, you can resubmit your application unless other revisions to the PQL application are needed..
Option 2: Upload a Document From Your Computer
Choose this option if you need to upload the corrected Financial Statement or Report from your computer. Follow the instructions below to attach it to your PQL application.
-
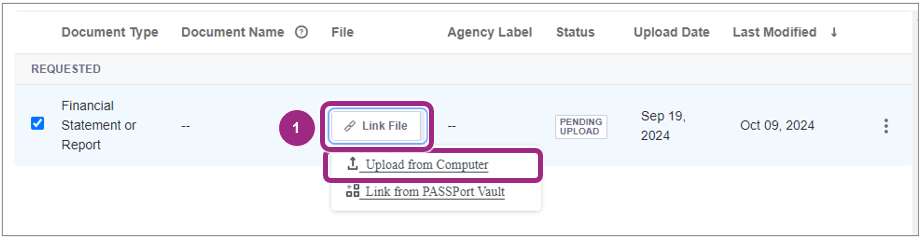
Click the Link File button, then select Upload from Computer from the drop-down menu.
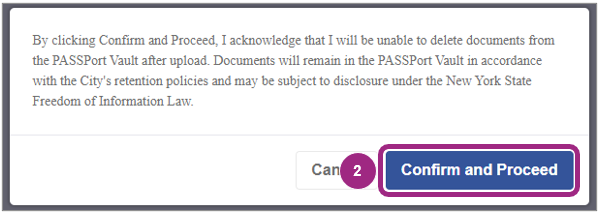
A window with a message appears. Confirm you understand that any files uploaded to the Vault cannot be deleted after upload in accordance with City record retention policies and may be subject to FOIL.
-
Read the message and click the Confirm and Proceed button to continue.
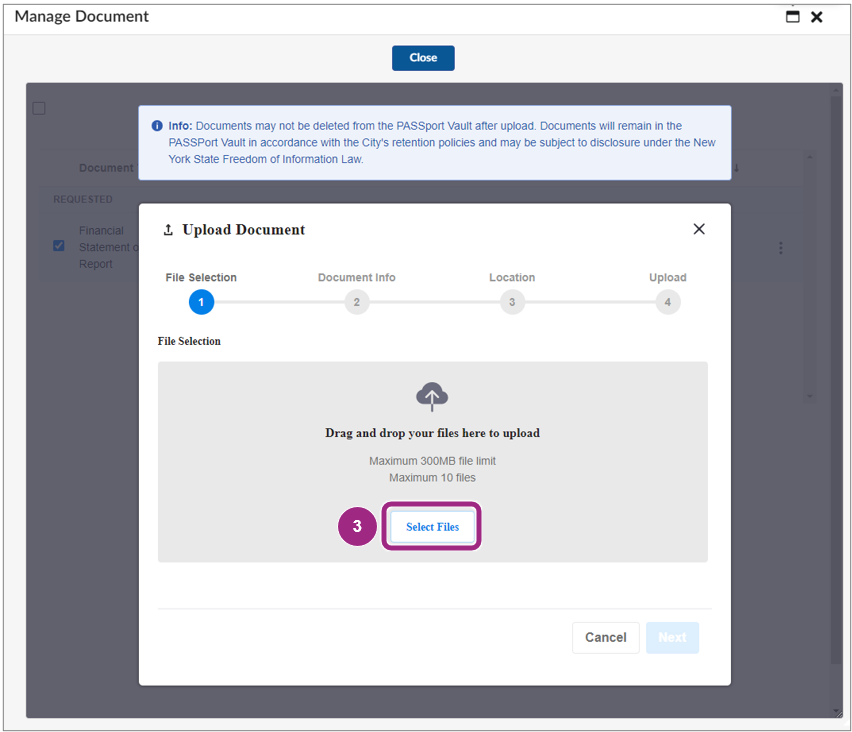
The Upload Document window displays.
-
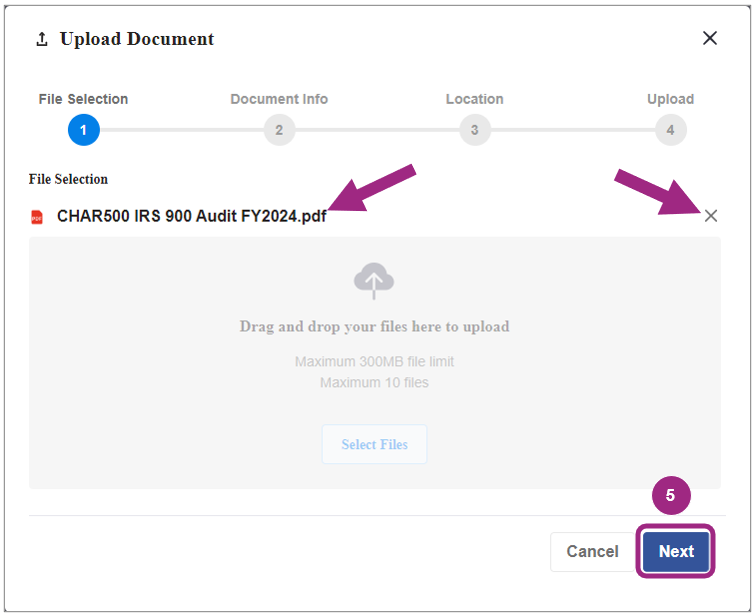
Click the Select Files button to find and select the document on your computer.
- After a file is selected from your computer, the name will display in the File Selection section. If the wrong file was selected, click the X to the right of the file listed and repeat step 3.
-
Click the Next button to continue to the next Upload Document screen, Document Info.
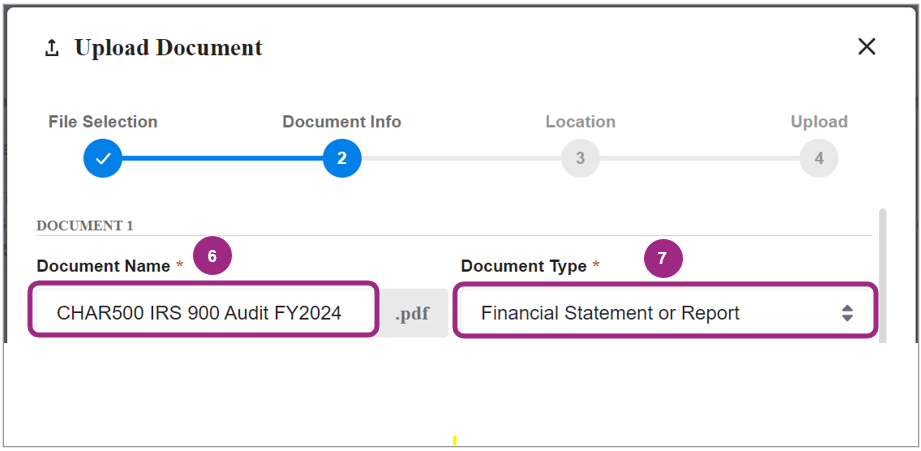
- Optional: In Document Info, edit the Document Name by typing a new name in the text field.
-
Click the Document Type drop-down and select Financial Statement or Report from the list.
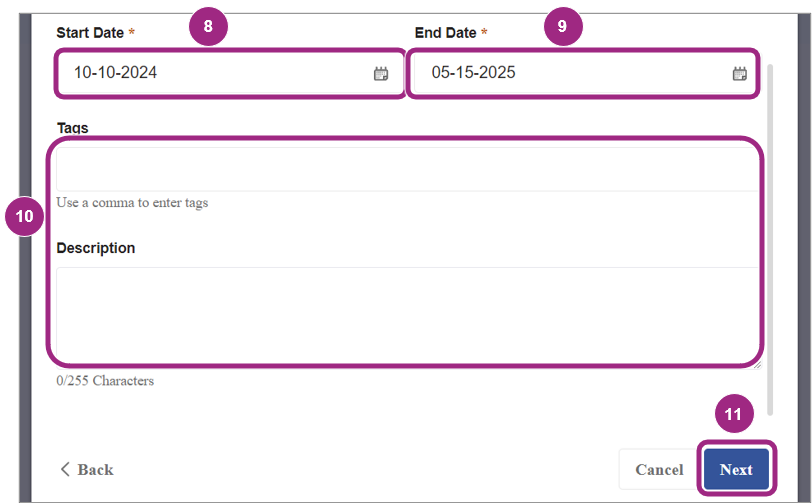
- Select the Start Date which will be the day of HHS PQL application submission.
-
Select the End Date.
Important: Nonprofits should select their next annual NYS Charities Bureau filing Due Date (in most cases).
For-profit entities and nonprofits exempt from submitting annual Charities Bureau filings should choose the date 3 years from the application submission date.
- Optional: Add tags and a description to help you and your colleagues find this document in the Vault.
-
Click the Next button and proceed to the Location step.
-
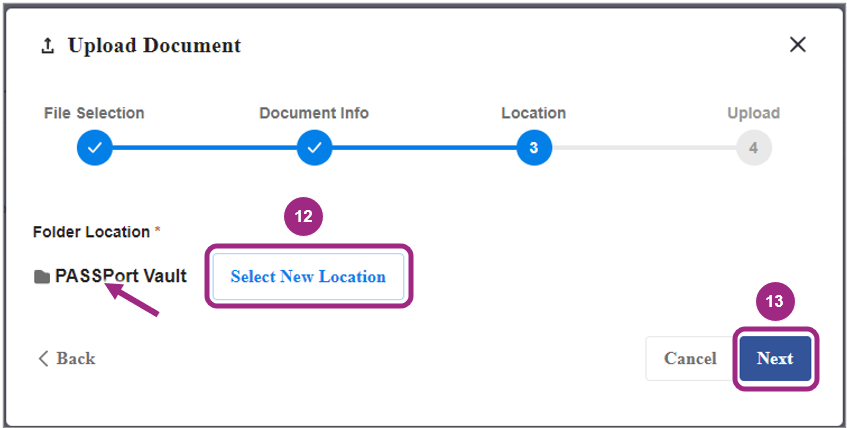
In Location, review the Folder Location which defaults to the main PASSPort Vault folder. To change the destination folder, click the Select New Location button and choose the new location.
-
Click the Next button to proceed to the final Upload step.
Tip: Refer to the Vault Best Practices guide on organizing documents and folders.
-
In Upload, a progress meter will displays as the file uploads.
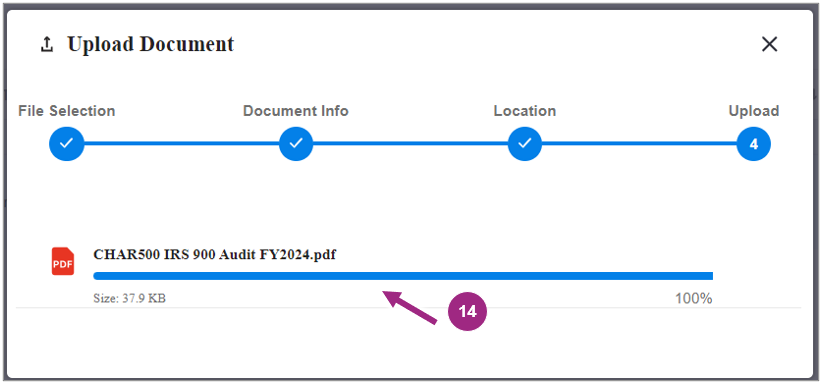
After 100% upload is achieved, you are returned to the Manage Documents window.
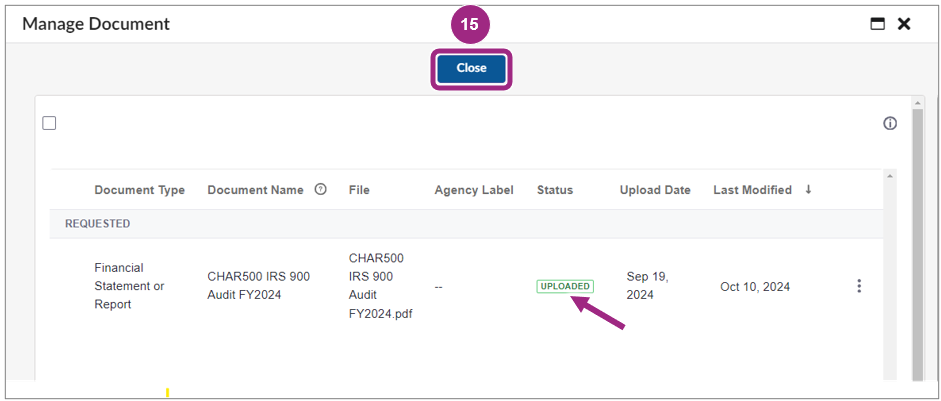
-
Review and confirm the correct file is uploaded, then click the Close button at the top of the window to return to the Documents tab.
-
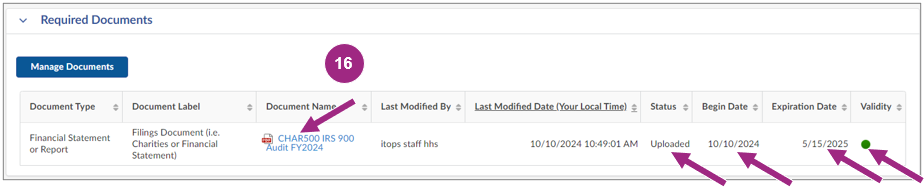
In Required Documents, confirm the Document Name shows the uploaded file with the file icon in the table.
Note: The Start and End Dates appear in the table as the Begin and Expiration Dates. When the document expires, the Validity updates from green to red.
At this point, you can resubmit your application unless other revisions to the PQL application are needed.
Change the Document Start and End Dates
After unlinking the document from your HHS PQL application, change the Start and End Dates (also referred to as Validity) of the document directly in the Vault.
Follow the steps below to change the dates:
- Go to the PASSPort Vault. For guidance, see the Access the PASSPort Vault guide.
- Find the document in your organization's Vault. Need help finding that document? See the Search the Vault guide.
-
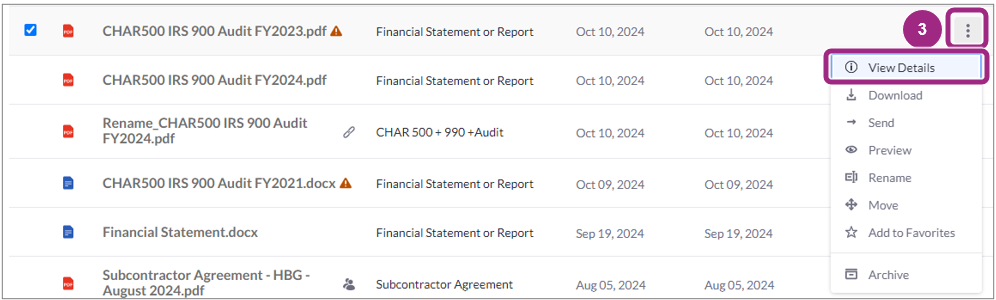
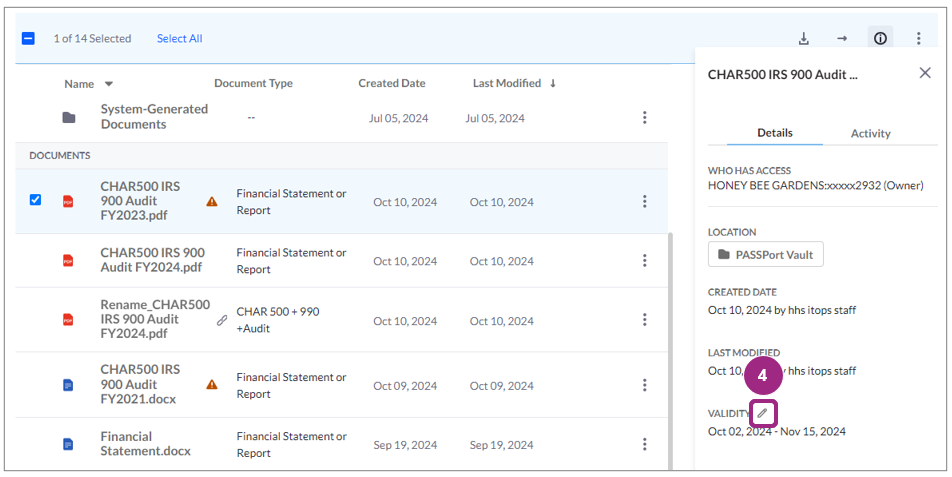
Click the ellipsis (3 vertical dots) on the right to view the drop-down menu, then select View Details.
The Details panel appears on the right of the screen.
-
The Details tab displays as default. Locate the Validity and click the pencil icon next to it.
In the example below, the Validity is expiring soon, and it's denoted by a red EXPIRING label below the listed Validity date.
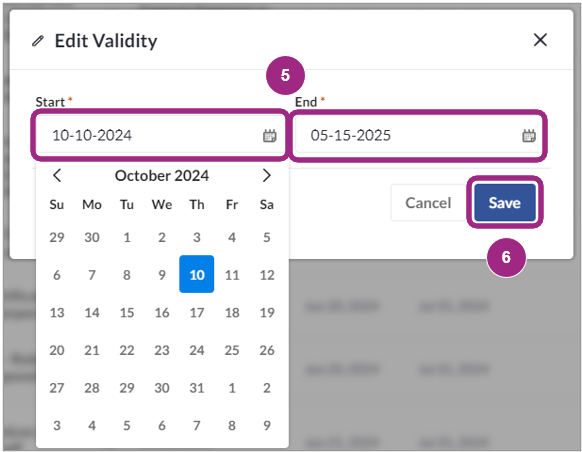
The Edit Validity window opens.
-
Change the Validity dates by clicking the Start and End date fields.
-
Click the Save button and return to the folder in the Vault where the document is located.
- Repeat step 3 to view and confirm the Validity dates have changed.
- At this point, you can link the document back to the PQL application by following the instructions to Link a Document Via the Vault earlier in this guide.
After re-linking the document, you can resubmit your application unless other revisions to the PQL application are needed.
Resubmit HHS PQL Application to MOCS for Review
After revising your Financial Statement or Report, resubmit the application back to your MOCS reviewer.
Note: If your MOCS reviewer requested revisions in the Questionnaire tab of the application, address these prior to resubmitting the application.
-
In the HHS PQL Application, click the Submit for Review button.

-
Click the Sign and Submit Application button to proceed to the Electronic Signature.
Note: Only users with the Vendor Procurement L2 or Vendor Admin role can sign and submit the application.

-
Read the statement and click the I Certify All of the Above checkbox.
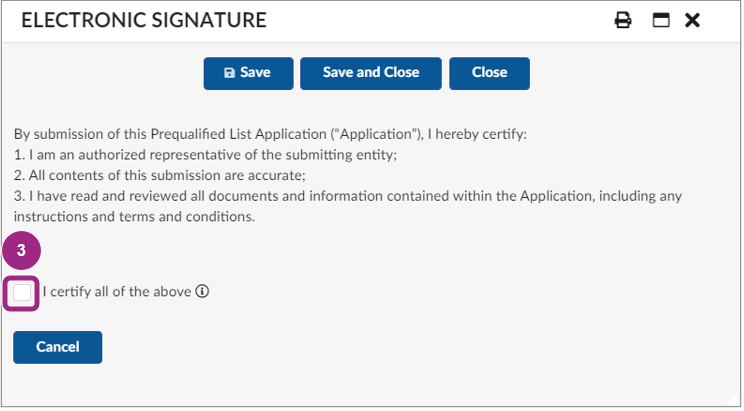
The window refreshes and the Sign button appears to the left of the Cancel button.
-
Click the green Sign button.
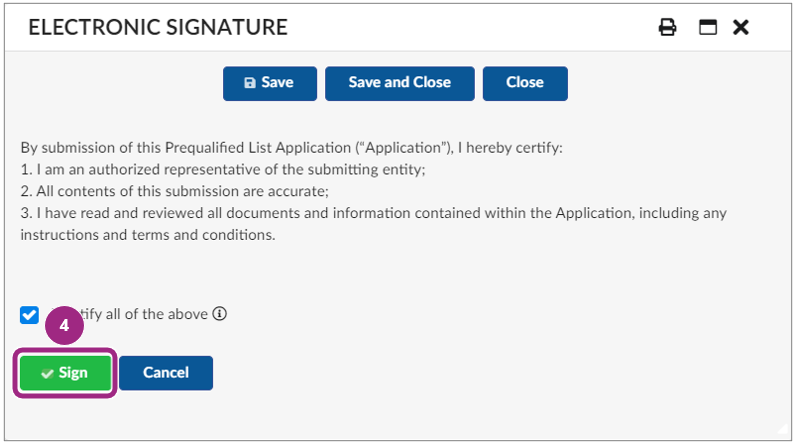
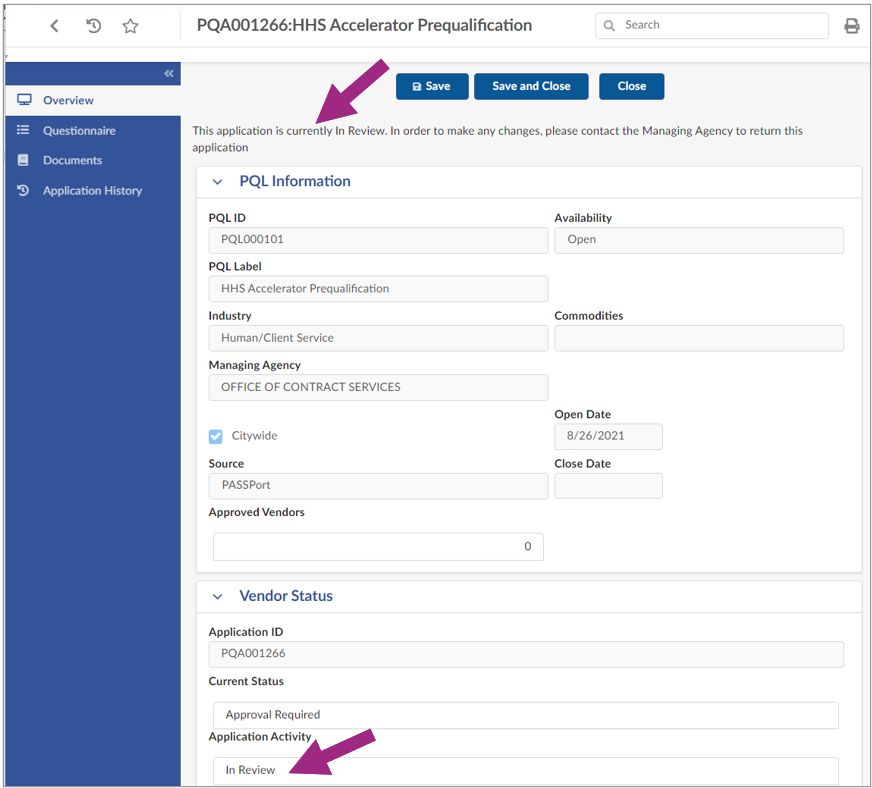
The HHS PQL application is now In Review with MOCS.
Note the message above the PQL Information section in the Overview tab:
This application is currently In Review. To make any changes, please contact the Managing Agency to return this application.
In the Vendor Status section, the Application Activity updates to In Review.
You will be notified of a decision by email.
Last updated: Aprril 18, 2025