


Apply a Credit to an Invoice
Learn how to apply negative adjustments (credits) to an invoice in PASSPort.
Before we begin
The steps in this guide can be completed by users provisioned with the roles
- Vendor Admin
- Vendor Financials L2
Important: Credits can only be applied to invoices for Human/Client Service contracts (i.e., the contract's Industry must display Human/Client Service.)
Overview
Negative adjustments, commonly called Credits, can be included in Provider invoices. Providers can only enter negative values against a line item that was previously invoiced and has an associated payment that is Approved or Disbursed.
Providers may need to request a credit for several reasons. Some examples include:
- The agency returned goods or rejected services (e.g., damaged product).
- The price on the original invoice was incorrect.
- The agency overpaid on the original invoice.
Apply an Invoice Credit
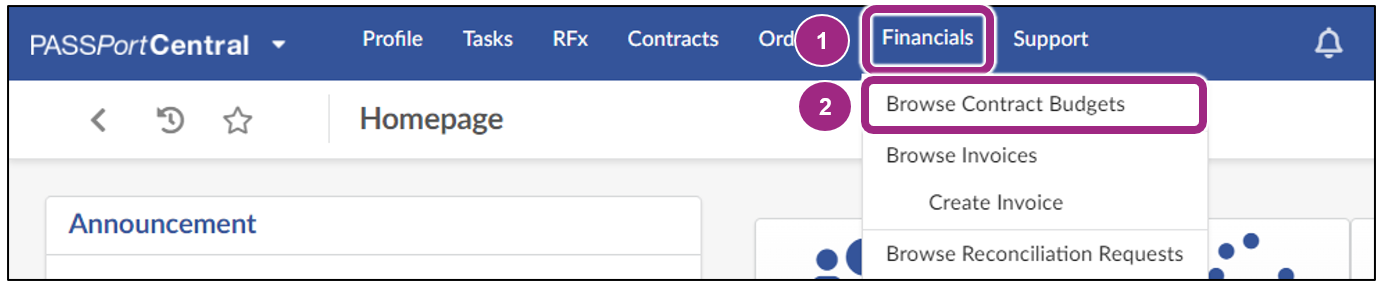
- From PASSPort Central, click or hover over Financials in the top navigation menu.
-
Select Browse Contract Budgets from the drop-down menu.
-
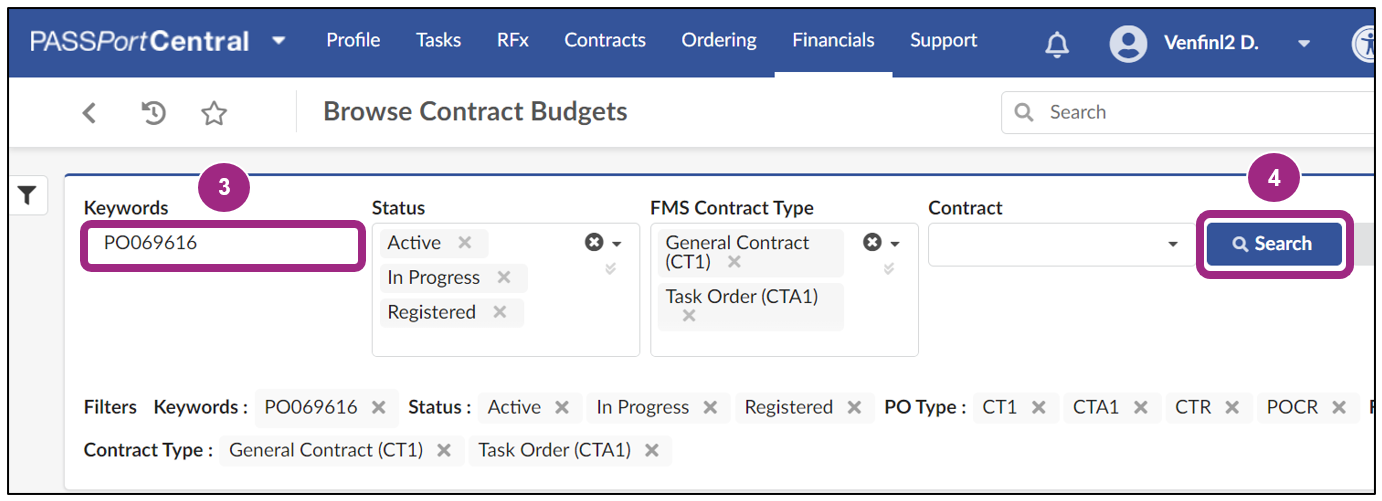
In the Keywords field, enter the six-digit Purchase Order ID (PO ID).
If you do not know the PO ID, enter the Contract ID or Contract EPIN.
-
Click the Search button.
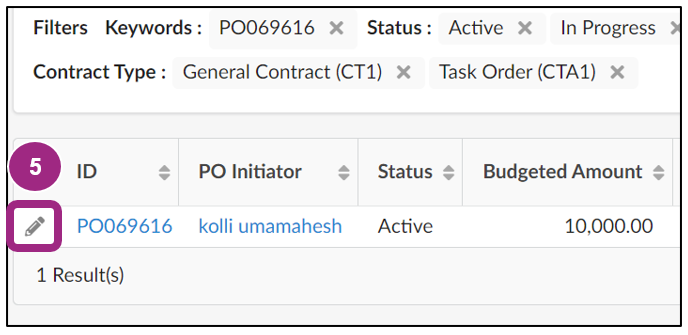
Purchase orders matching the search criteria display in a table below the search fields.
-
To view the purchase order, click the pencil icon to the left of the PO ID column.
Note: Ensure the purchase order is in Active status.
The PO Overview tab opens.
-
Click the Create Invoice button near the top of the page.

-
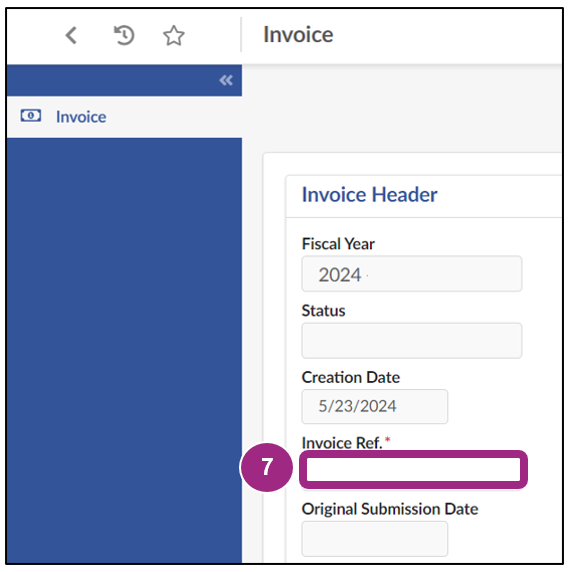
In the Invoice Header section, enter an invoice reference number in the Invoice Ref. field.
You can enter any numeric or alphanumeric characters to identify the invoice.
-
Scroll down the Invoice Header section to the Payee Address field. Ensure Payee Address is the same address used by your organization in the Payee Information Portal.
-
Click the Save button near the top of the page.

Invoiceable items can now be added to the Products / Services section.
A system generated Invoice ID (starting with 'INV') appears in the page heading (shown in text at the top of the page) and the invoice status updates to 'Draft'.
-
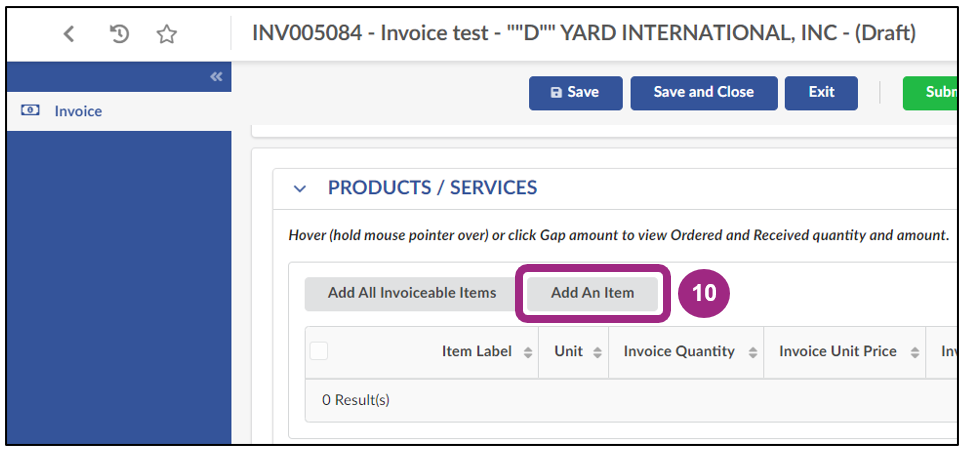
Scroll down to the Products / Services section and click the Add An Item button.
The Add/Edit Invoice Lines window opens.
-
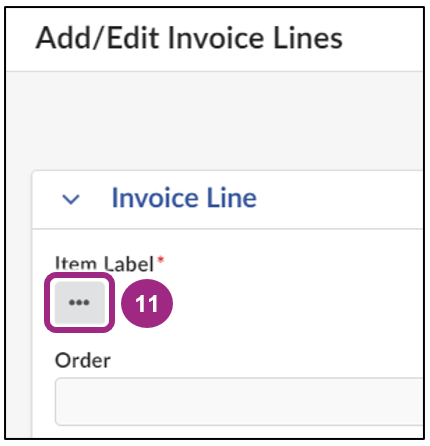
Click the ellipses (…) button under Item Label.
-
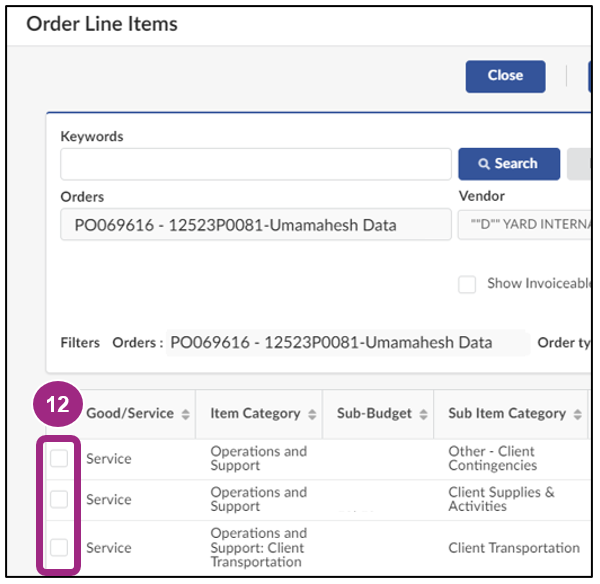
In the Order Line Items window, click the checkbox to the left of the item you would like to credit back to the PO Budget.
This automatically returns you to the Add/Edit Invoice Lines window.
-
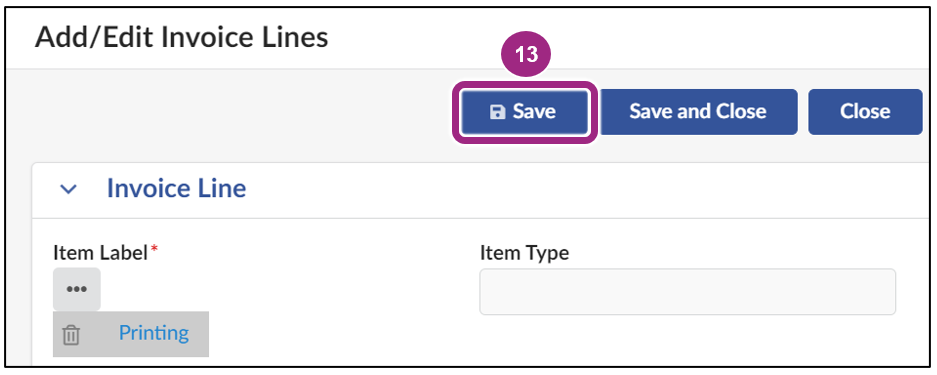
The item now appears under the Item Label field.
Click the Save button at the top of the window.
-
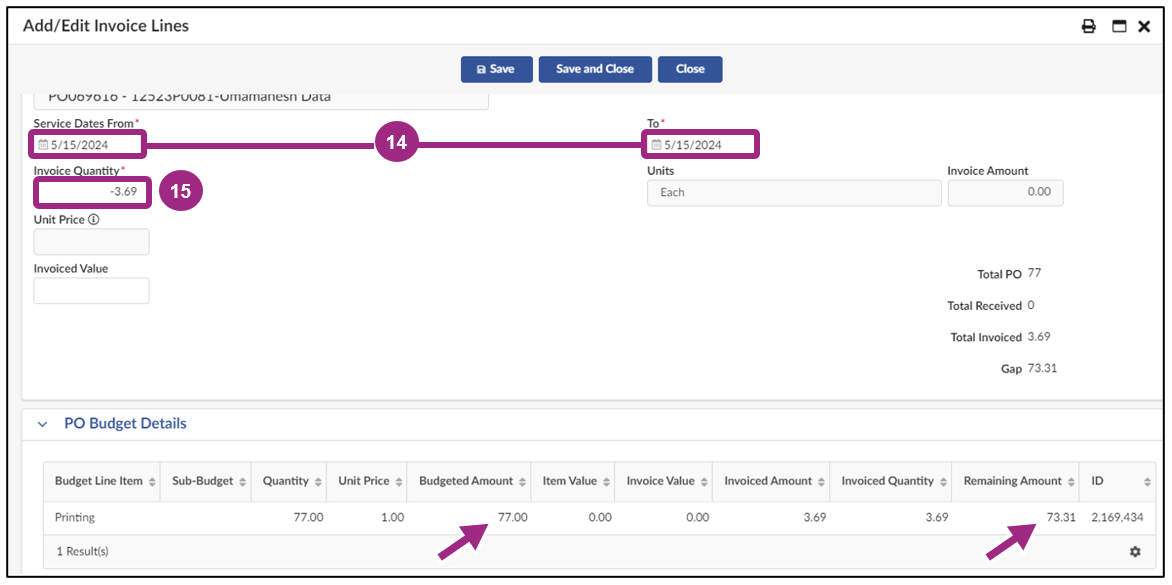
Scroll down and enter the service dates in the Service Date From and To fields.
Both dates should be within the purchase order's fiscal year.
-
In the Invoice Quantity field enter a negative quantity.
This should equal the amount you want to add back to the budget. In this example, we are crediting the invoiced amount of $3.69 back to the budget by entering -3.69 into the invoice quantity field.
Important: When adding funds back to the budget, the value of the Invoiced Quantity and Remaining Amount in the PO Budget Details section should not equal more that the Budgeted Amount. In this example, the original budgeted amount is $77, and the remaining budgeted amount is $73.31. In this case, no more that the Invoiced Quantity of $3.69 should be added back to the budget.
-
Click the Save and Close button near the top of the window to return to the Invoice page.

-
Back on the Invoice page, scroll down to the Products / Services section. The negative invoice line is listed in this section.
Click the Add An Item button to repeat steps 11-16 to add positive lines.
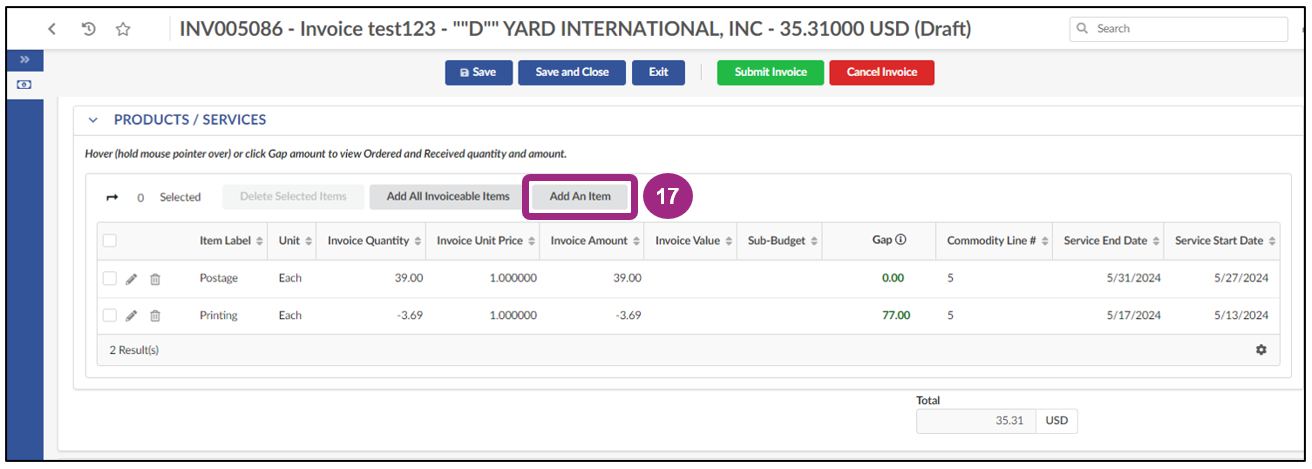
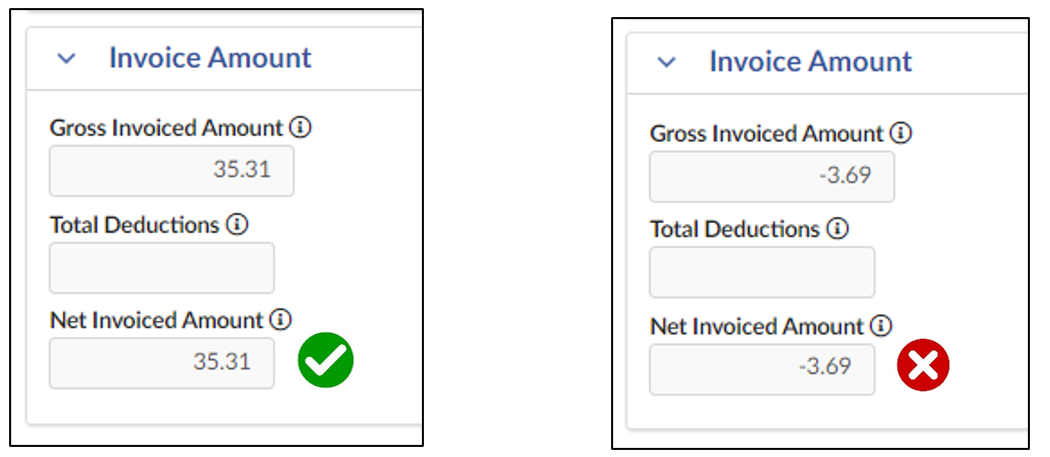
The Gross Invoiced Amount field in the Invoice Amount section will update to reflect the total amount of all lines added to the invoice.
Important: Net negative invoices cannot be submitted. The Net Invoiced Amount in the Invoice Amount section must be a minimum of “0” dollars to successfully submit the invoice. To achieve this the credit line must be paired with positive lines to ensure the invoice amount is net positive.
-
When ready to submit, click the Submit Invoice button near the top of the page.

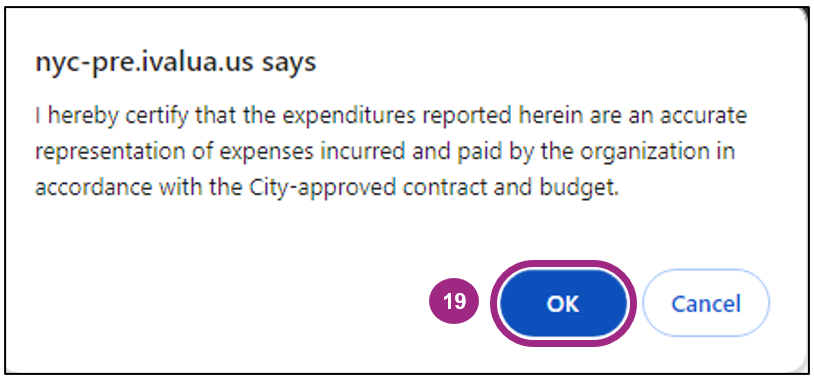
A dialog box appears requesting certification.
-
Click the OK button in the dialog box to certify the listed expenditures on the invoice are accurate.
The invoice is submitted to the agency who will review and approve or reject the invoice. Credits will become available once the invoice has been approved.
Last updated: May 13, 2025