


Submit Invoices
Organizations can create and submit invoices for their active contracts through PASSPort.
This guide covers invoices for General Services contracts and Task Order contracts.
Before we begin
The user submitting invoices should have the Vendor Admin or Vendor Financial L2 roles in PASSPort.
Step 1 of 7
On the top navigation menu, click Financials. A drop-down menu will appear; click Browse Contract Budgets on the menu.
Step 2 of 7
Locate the purchase order
In the Keywords text field, enter the Purchase Order ID (the PO ID, also known as the PO number).
If you do not know the PO ID, click the funnel icon on the far left to use other search criteria to locate the PO ID.
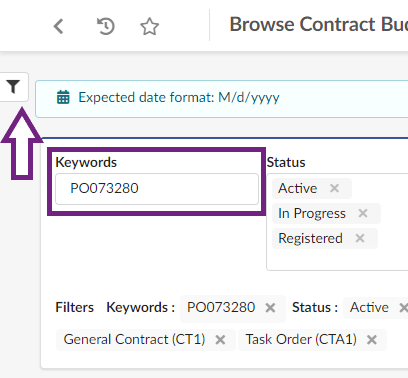
Click the Search button. Purchase orders matching the search criteria will display in a table below the search fields.

To view the purchase order you want to create an invoice for, click the pencil icon to the left of a search result's PO ID.
Step 3 of 7
Click the Create Invoice button near the top of the page.
In the Invoice Header section, enter an invoice reference number in the Invoice Ref text field. Use any type of numeric or alphanumeric information to help identify the invoice.
Check the Payee Vendor and Payee Address fields in the Invoice Header section. The Payee Address should be the same address used by your organization in the Payee Information Portal.
Step 4 of 7
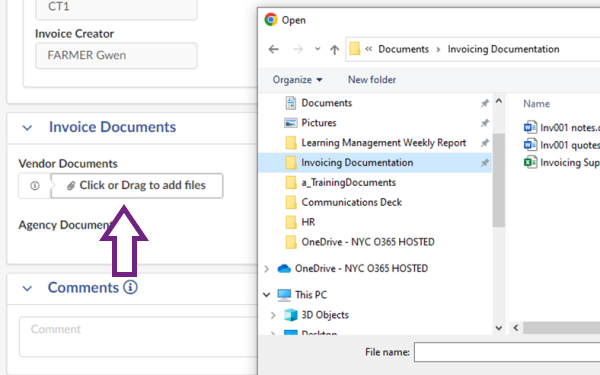
Upload supporting documentation
To upload any supporting documentation required by the contracting agency, find the Invoice Documents section.
Click the Click or Drag to add files button to select your document.
- The Document format must be PowerPoint, Excel, Word, or PDF.
- Maximum file size is 125 MB.
- There is no limit to the number of files that can be attached.
Click the Save button near the top of the page. Invoiceable items can now be added to the Products / Services section.
A system generated Invoice ID (starting with 'INV') will now appear in the page heading (shown in text at the top of the page) and the invoice status will update to 'Draft'.
Step 5 of 7
Add invoiceable items
Find the Products / Services section. There are two options:
- The Add All Invoiceable Items button
Adds all line items marked 'Invoiceable'. - The Add An Item button
Add items one by one.
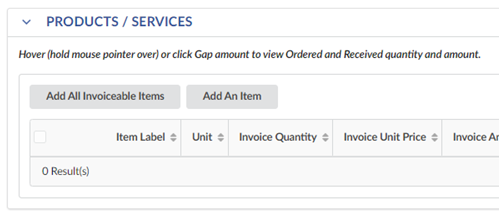
The following instructions use the Add All Invoiceable Items option. When the button is clicked, invoiceable items from the budget will automatically fill the table below the buttons.
For each invoiceable item,
- Click the trash can icon found on the left side of the table to remove a item line that your organization is not going to invoice.
- Click the pencil icon found on the left side of the table to access the item line information. An Add/Edit Invoice Lines window will appear on the page.
Step 6 of 7
Enter information for invoice lines
In the Add/Edit Invoice Lines window, enter the required information:
- Enter dates in both the Service Dates From and the To fields. Both dates should be within the purchase order's fiscal year.
- Based on Units,
- If Units is 'Each', click the Invoice Quantity text field and enter the quantity you want to invoice.
- If Units is 'Dollar', click the Invoice Amount text field and enter the amount you want to invoice.
- The quantity or amount you want to invoice must be less than or equal to the Remaining Amount for this item line on the PO budget.
- Leave the Invoiced Value text field empty.
Click the Save button near the top of the window to update the invoiced amount.
Click the Save and Close button near the top of the window to close the Add/Edit Invoice Lines window and return to the Invoice page.
Click on the pencil icon for each invoice item line you want to add and repeat this step.
If using the Add An Item button to add item lines individually, the above instructions apply.
Additionally, an Item Label must be added by clicking the ellipsis icon under Item Label in the Invoice Line section.
Step 7 of 7
Submit invoice and certify
Click the Save button near the top of the Invoice page. In the Invoice Amount section, the Gross Invoiced Amount field will update.
Click the Submit Invoice button near the top of the page. A dialog box will pop up requesting certification.
Click the OK button in the dialog box to certify the listed expenditures on the invoice.
If the invoice is successfully submitted, a message displays near the top of the page.
The Invoice Header section will have new information:
- The Status text field states Invoice Approval in Progress.
- The Original Submission Date text field shows the invoice submission date.
Invoice status may be monitored either directly via the invoice or via the purchase order with all invoices submitted for that fiscal year.
Last updated: November 17, 2023